

General Data Protection Regulation mentions cookies only once. According to that, cookies are online identifiers. That means every user has to give the consent to the collection of his/her personal data. Alya Surikova, Software Engineer at Ringostat, shares hack of how to customize the extension to comply GDPR rules. To implement that, all you need is Google Tag Manager and minimal skills in working with it.
Both our website and blog collect and store users cookies. When we started preparing for GDPR coming into force, we needed a specific extension for cookie consent floating bar. First of all, we researched different options but none of them fully satisfied us.
We activate all the external scripts in Google Tag Manager and implementation of third-party developments could lead to the huge changes in our GTM structure.
Therefore, we decided to develop our solution. It’s not complicated for the implementation and allows us to solve our tasks. Now we want to share it with you to simplify your compliance with GDPR.
For site visitors, this extension looks like floating bar.
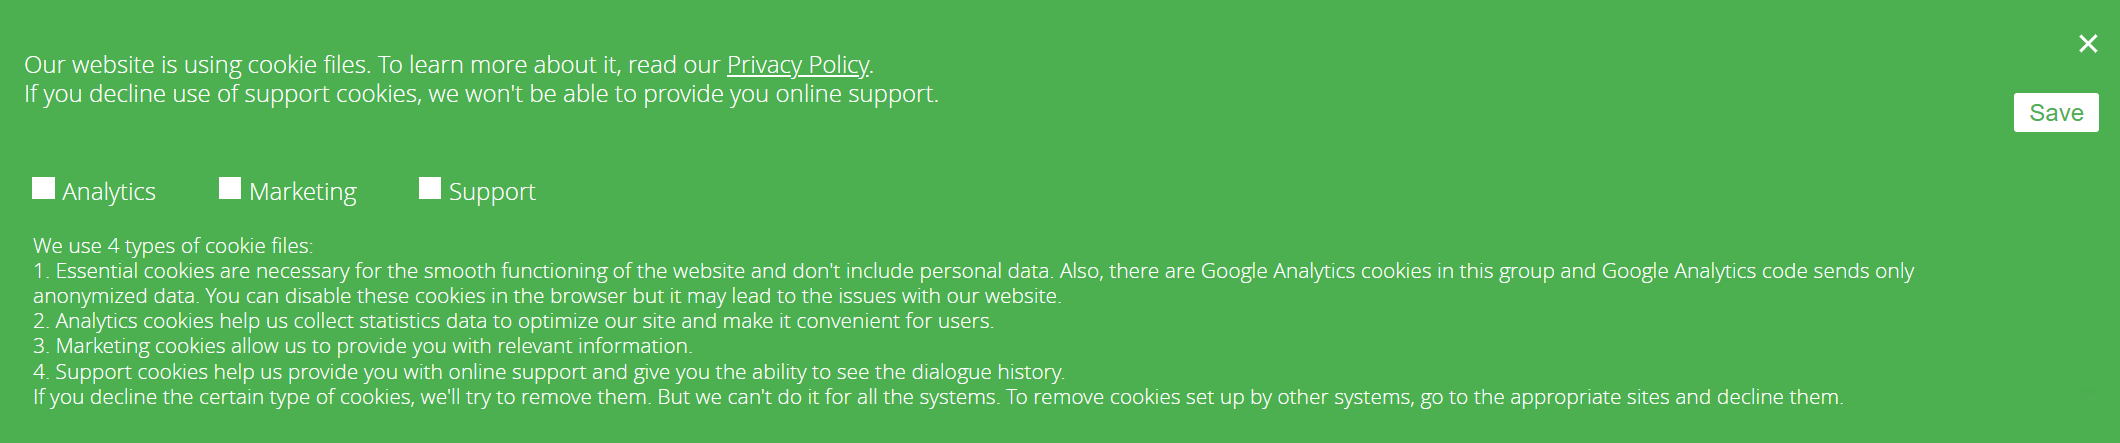
As you see, we collect three types of files and essential cookies which provide the correct site display. Visitors can decline any of them by unticking the box. Right after that, the data will be removed.
The benefits of this solution
- Easy-to-install. Most of the other existing solutions are installed through a specific script or require complicated import to Google Tag Manager (GTM). The last option is especially difficult for those who have many settings in Google Tag Manager. For example, we have more than 60 tags, 75 variables, and about 70 triggers.
- Google Analytics can be launched anonymously. The best services weren’t available for this.
- Free. Our guide allows you to save money and not pay for the ready-made solution. Anyway if you choose a ready-made solution, you still have to customize it.
Besides, the setting of this extension on Google Tag Manager has following advantages:
- It doesn’t require programming skills, you can manually install the script on your website.
- Before publishing updates, you may check new and old functions at Preview mode.
- Publish history. If something goes wrong, you can easily cancel updates and return to the previous version.
The following guide is an example of the configuration which is suitable for us. You can custom the extension according to your needs, correct texts and styles, add or remove buttons, change their algorithm.
Instruction to Configure the Extension
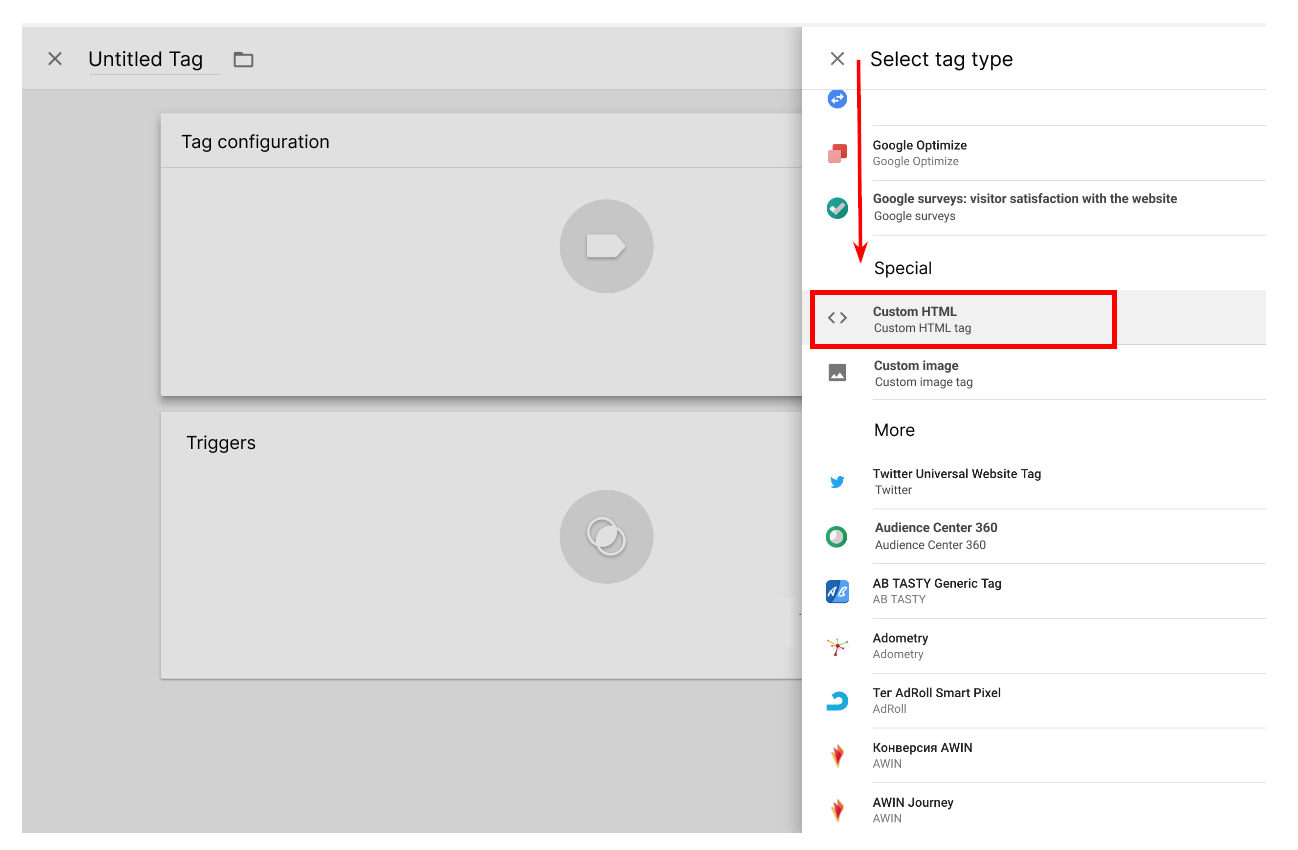
1. Create tag
Open GTM, choose the section Tags in the right bar and press the button Create. Choose the tag type Custom HTML.
Here’s the link to the script you need to copy.
The script has three variables which store the cookies of different types. Our variables Marketing, Analytics, and Support are highlighted in blue. You can add/remove/change variables content according to your needs.
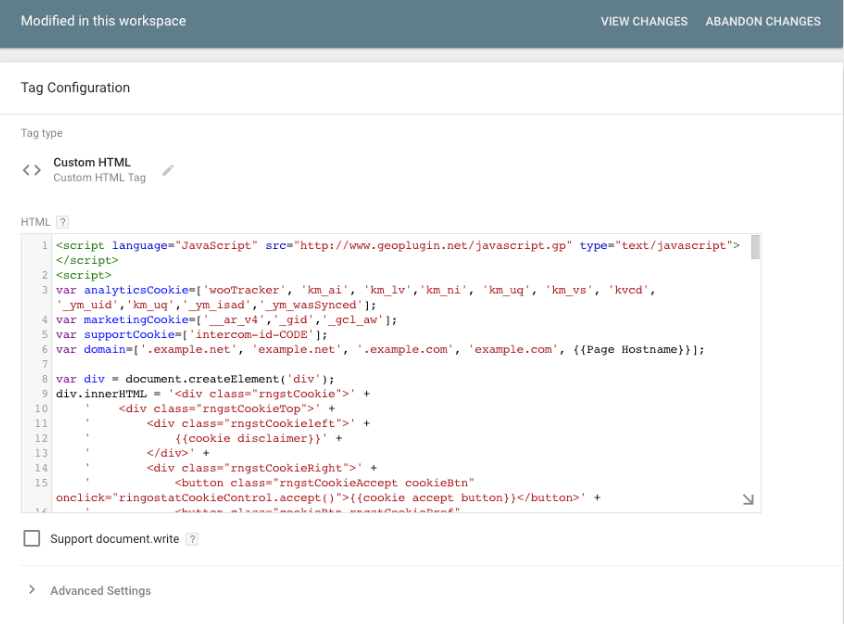
You have to change data depending on cookies type your site collects. Enter the list of all site domains to the line domain.
2. Create variables
Create variables and configure them according to the following screenshots. But take into consideration features of your website.
Ringostat-locale
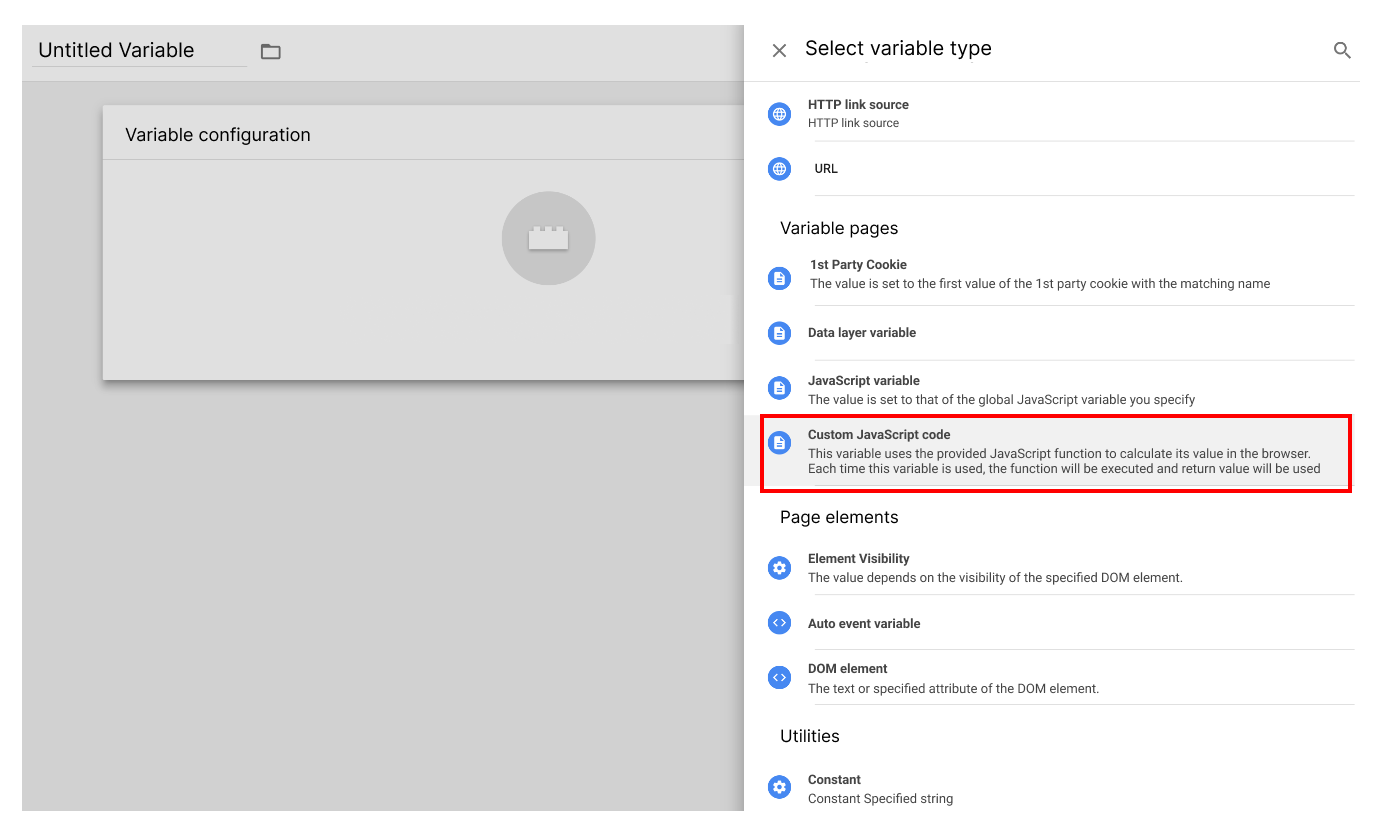
You need this variable when using localizing the floating bar depending on user location. The name of this variable is Custom JavaScript.
Paste this script to the variable ringostat-locale:
function() {

var locale = ((/\/en\//).test(document.location.href)?"en":((/\/uk\//).test(document.location.href)?"uk":"en"));

return locale;}
This variable is needed to change the floating bar language according to the domain location. For example, it will show text in English to users on domain example.com. After configuration, it gives the language identifier for these variables:
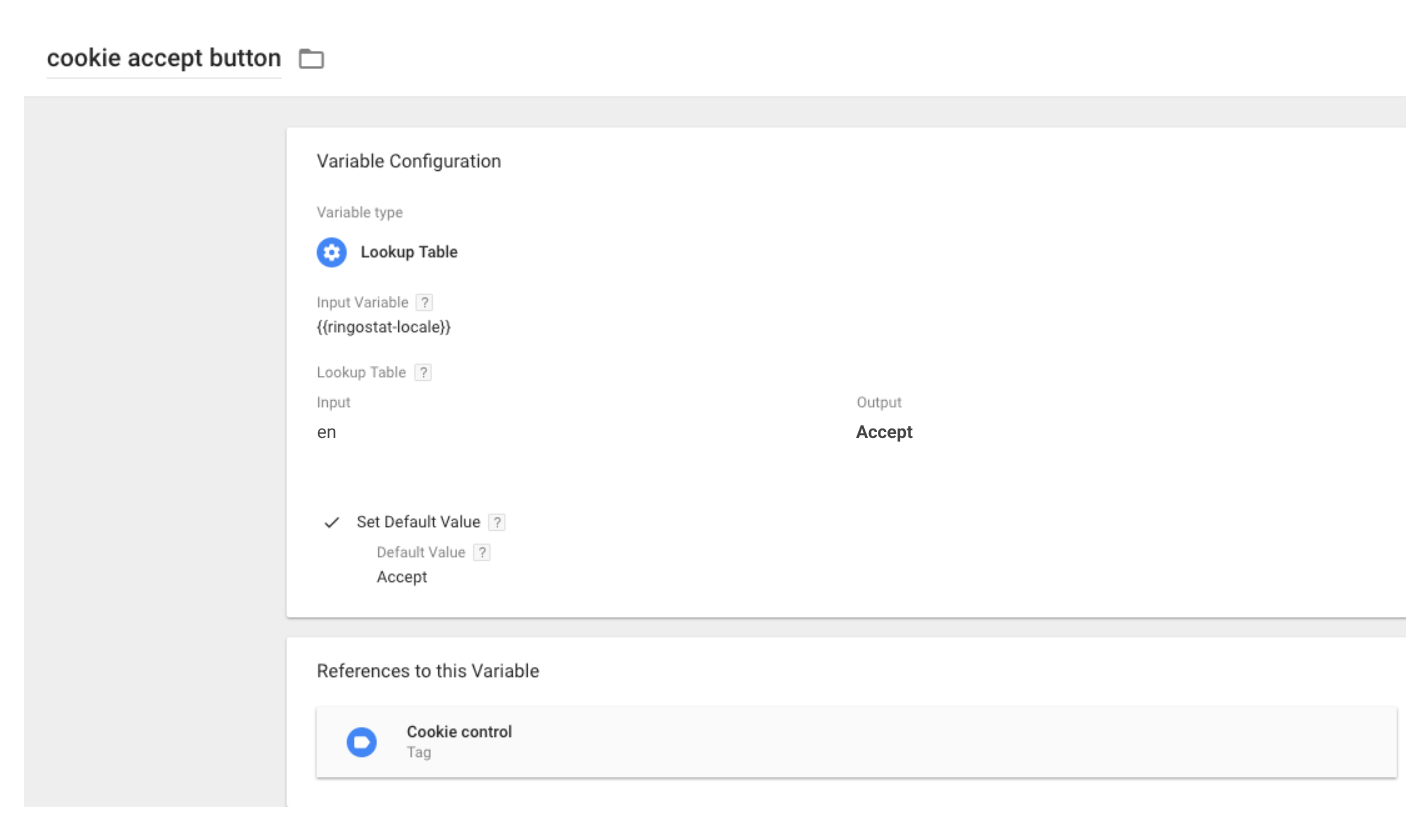
- cookie accept button — button Accept:
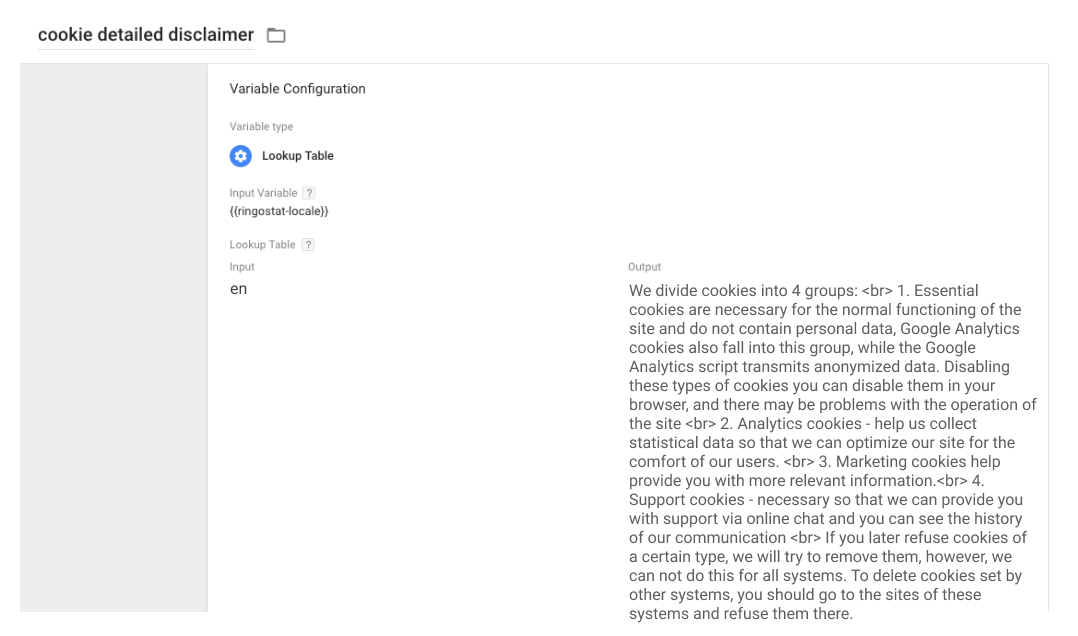
- cookie detailed disclaimer — detailed description of cookies types we use:
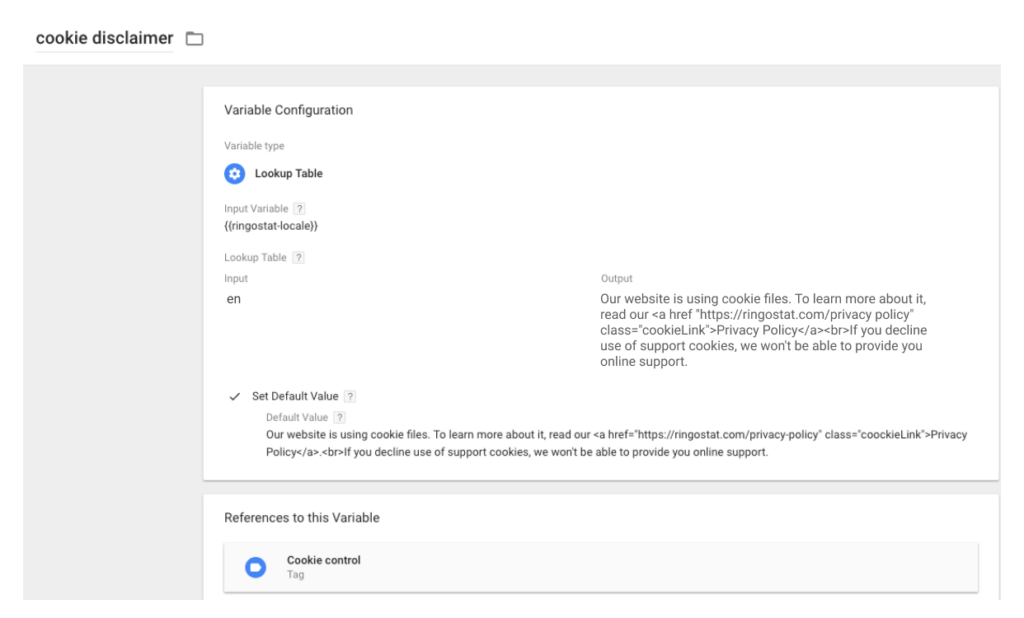
- cookie disclaimer — quick warning about cookies:
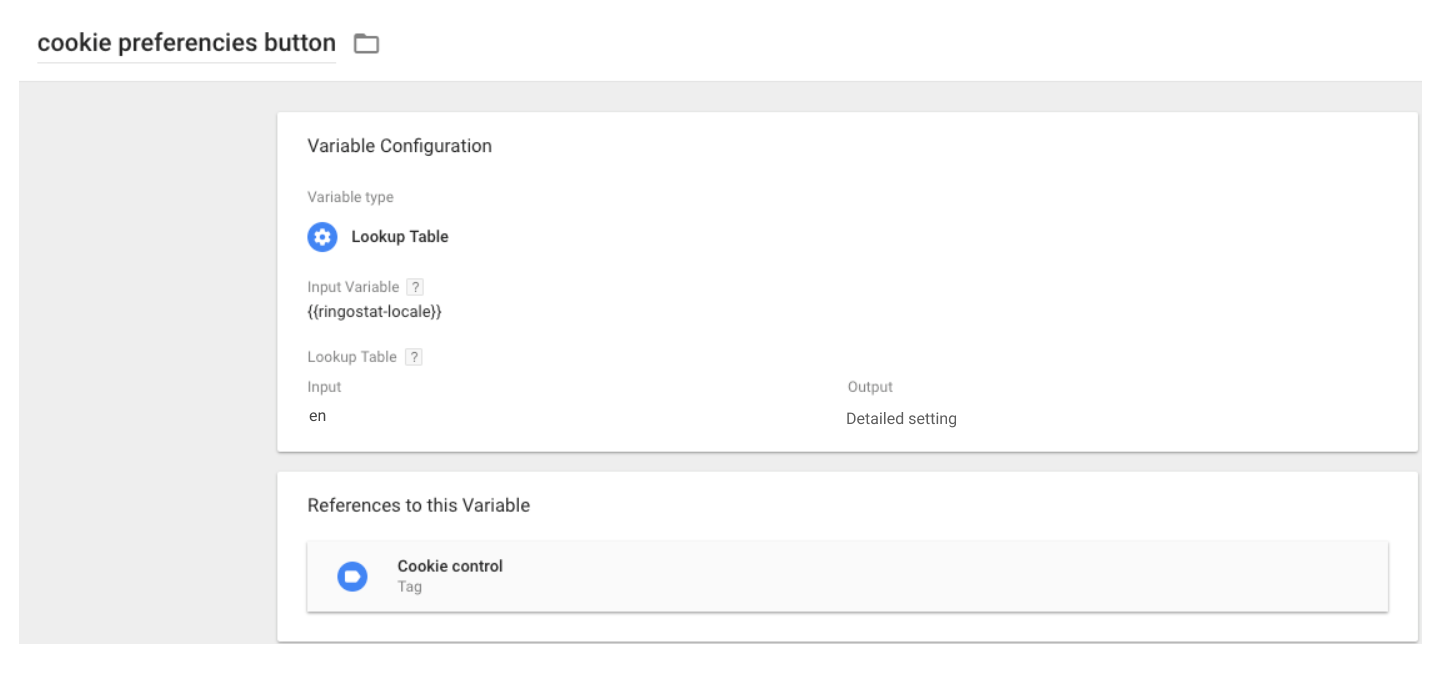
- cookie preferences button — the text on the button for the detailed setting:
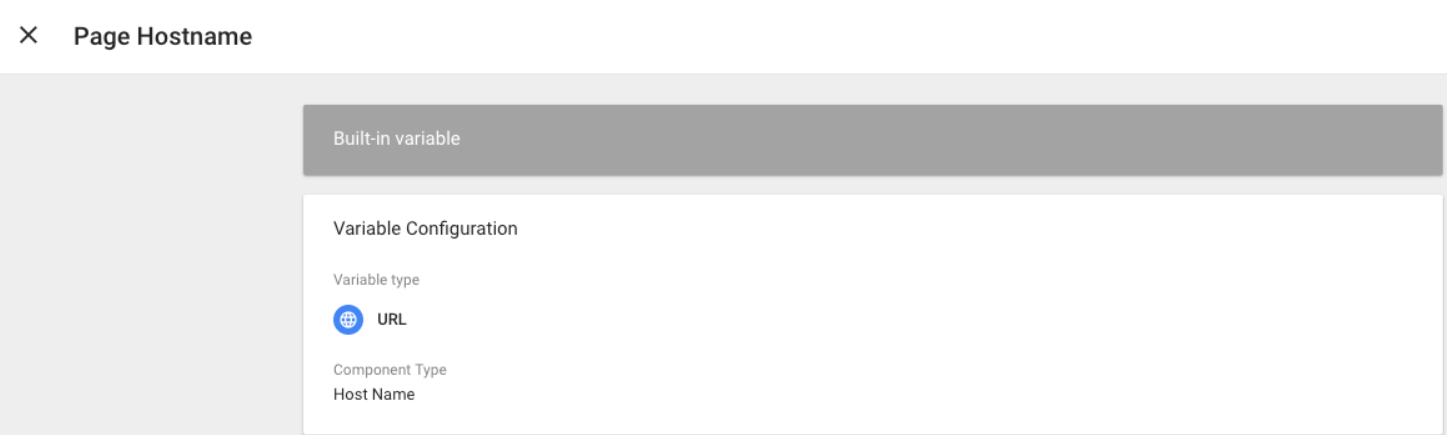
Page Hostname
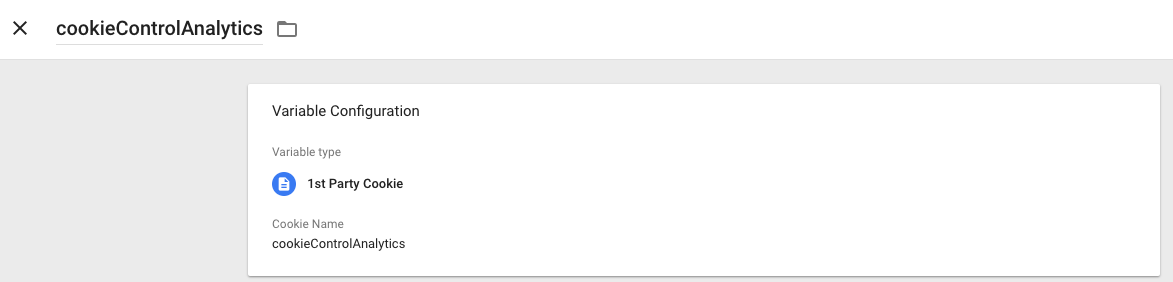
CookieControlAnalytics
CookieControlMarketing and СookieControlSupport
Both variables can be configured according to the previous screenshot but you need to change the name of cookie and variable.
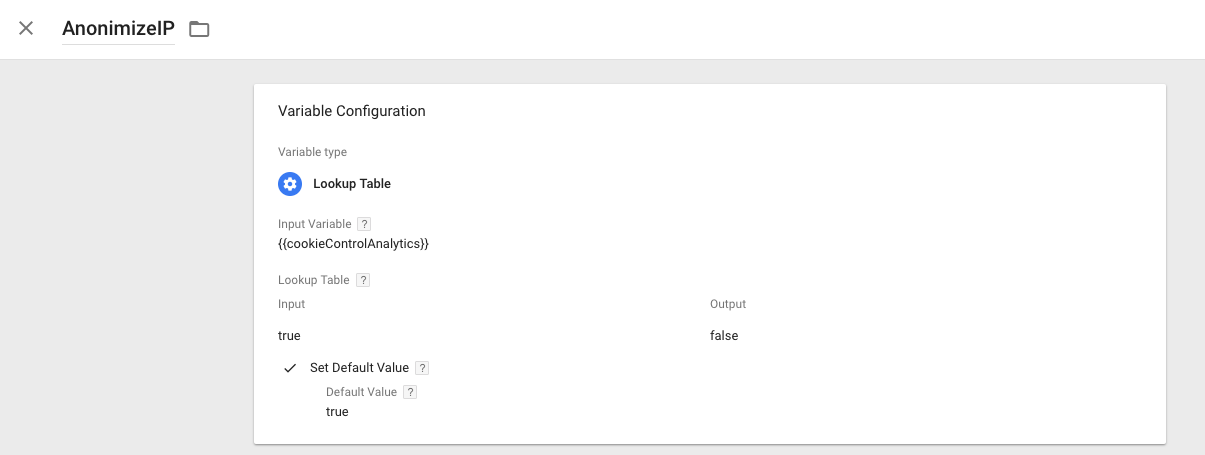
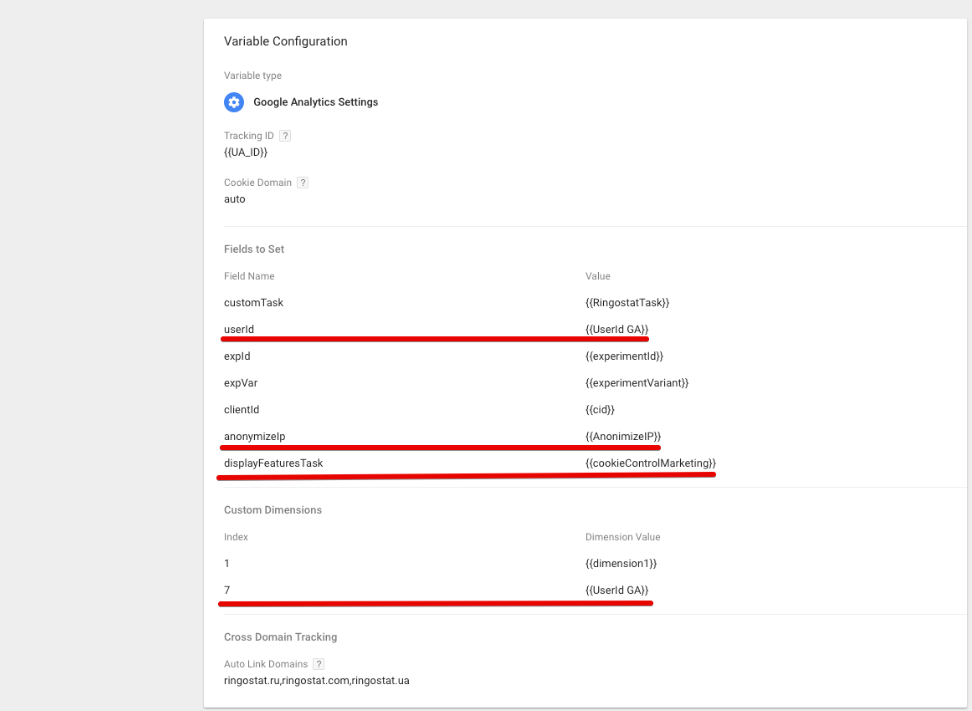
AnonimizeIP
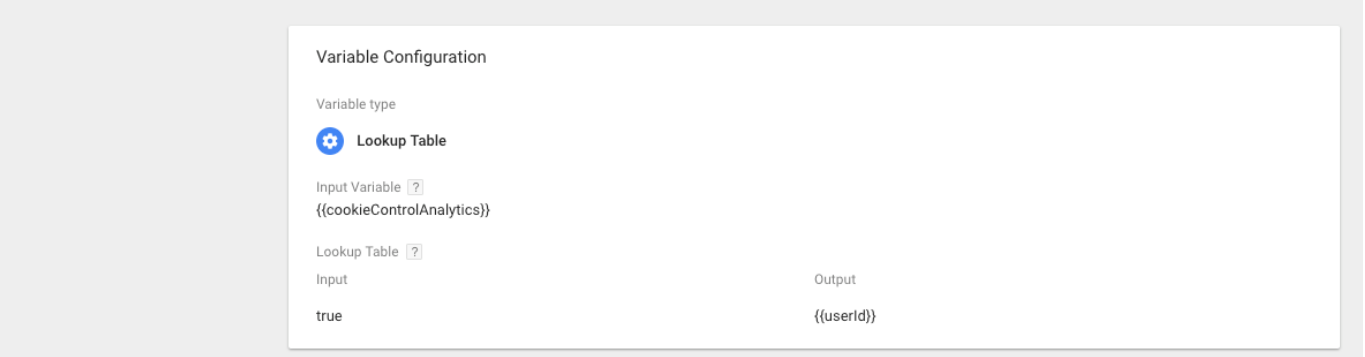
UserId GA
It’s needed if you track this metric on Google Analytics.
If you don’t have the variable type such as Google Analytics Settings, create it. The screenshot shows what you need to change. If you don’t use the variable and separately specify settings for each tag, configure all you tags of Universal Analytics type accordingly.
3. Create triggers
Then go to Triggering section and create 6 triggers to learn about if the site visitors check the boxes.
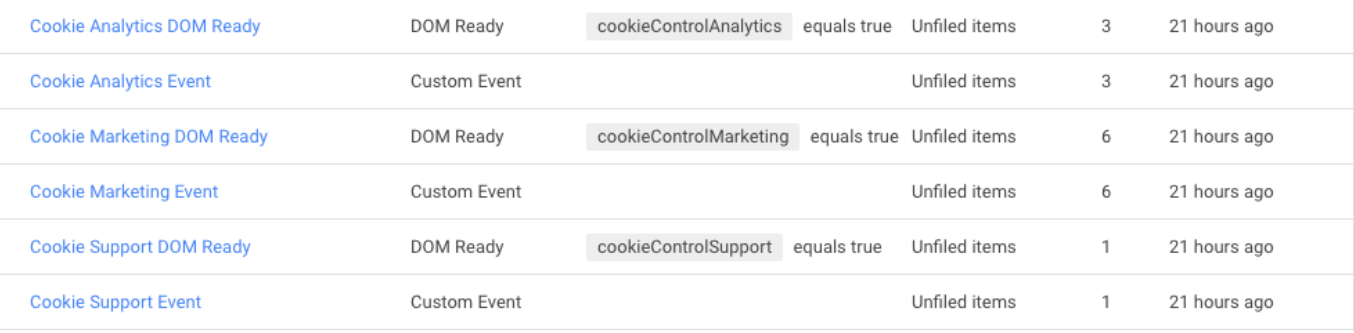
Here are the settings for 2 of them so you can configure other triggers similarly.
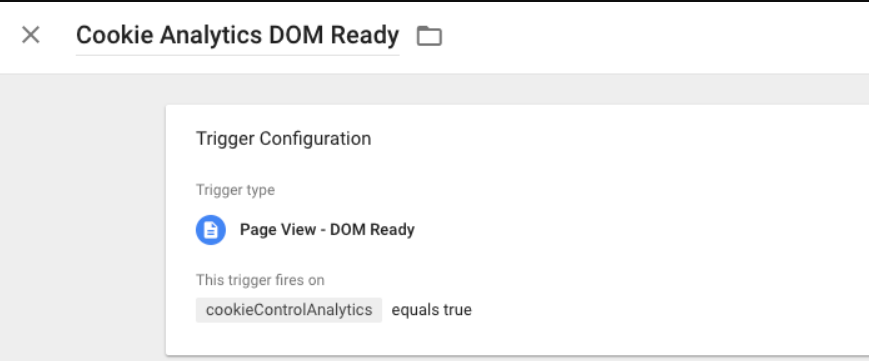
These triggers respond to when the people check a certain box.
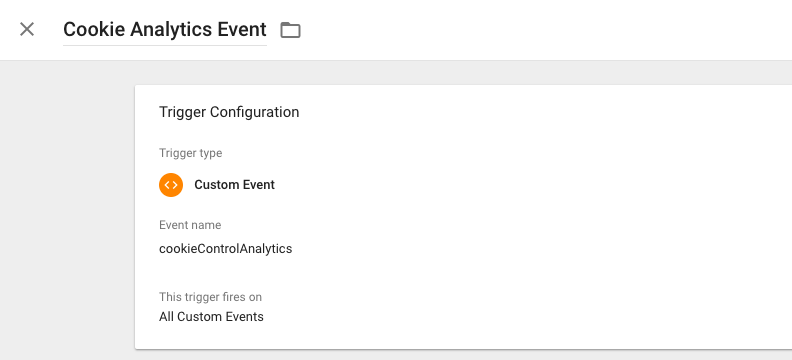
Change the triggers in the tags to match them with their types. Thus, you’ll set up the event when the trigger is launched. For example, if somebody checks the box Support, the trigger Cookie Support Event activates.
Instead of default triggers DOMReady or Pageview, we create new ones which have to launch tags if this script type is allowed. Here’s the sample of trigger setting for services our website uses.
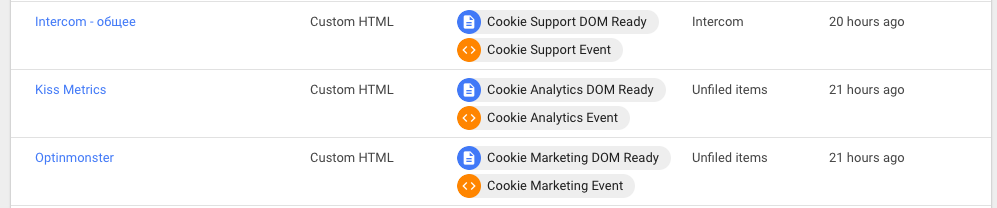
The last configuration suits sites which use Intercom communication platform as we do.
Also, the script has reference to geoplugin.net to determine if the user is located in EU or not.
<script language="JavaScript" src="http://www.geoplugin.net/javascript.gp" type="text/javascript"></script>If your site is on https, you’ll need to buy a paid version of Intercom and the activation line will be changed to this type of line:
<script language="JavaScript" src="https://ssl.geoplugin.net/javascript.gp?k=YOUR_KEY" type="text/javascript"></script>Below there’s a check that makes automatic acceptance if the user is not from EU and didn’t revoke this acceptance. Thus, if the user is from EU, he sees the floating bar to make the acceptance. Conversely, if the user isn’t from EU, he can press the button and withdraw the acceptance.
You can remove these blocks whether most of your clients are in EU. Probably, in this case, you don’t need to make extra check.
With this guide and Google Tag Manager, you can save on paid solution and avoid the risk to pay €20BN fine. But pay attention we’ve provided our own example of setting. That’s okay for cookies our site collects. You can have a totally different situation, therefore maybe it’s necessary to adapt our guide to your needs.
If you have any questions, comment on this post and we’ll try to help you.