Preparing a webinar consists of dozens of small tasks. But if you miss at least one thing, the event will be at risk of failure. Therefore, it is important to always have a well-thought-out plan. Olena Tarnawska, a marketing specialist responsible for the Polish direction at Ringostat, took care of this for you 🙂 Use her article as a guide for preparing a successful webinar. Olena also shares checklist templates for conducting an online event and evaluating its effectiveness.
At Ringostat, I am responsible for the company’s development in the Polish market, so I prepare events for the Polish audience. Don’t worry, the tips from my article will be effective in any market because the principles are the same. I am sure that the plan I will share will help save time for you, your company, and the speakers and avoid chaos.
First of all, I advise you to copy the checklist template for the webinar. It will be enough to remove/add the steps that are necessary in your case and put the necessary dates and responsible persons.
Preparing for the webinar
Keep in mind that all processes will take at least five weeks: one for research and four for preparation.
Decide on the topic
Choose your target audience
First of all, we need to think about who our webinar is for. What are the interests of your audience, their pain points, and what do they want to learn or achieve? Here’s a simplified example from Ringostat’s experience.
One of our most frequent clients is real estate developers. Their marketers are faced with fierce competition in the market and a high cost of customer acquisition. Such specialists are particularly interested in how to get more leads without increasing costs.
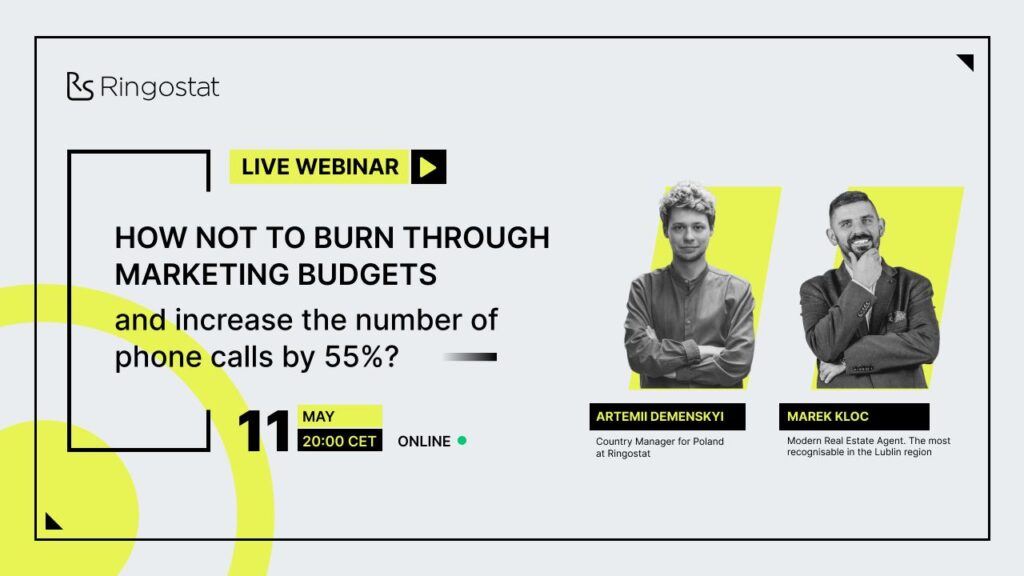
Knowing this, we chose the topic of the webinar: “How to avoid burning marketing budgets and increase the number of calls by 10 times?”
Defining the CTA — a call to action
The purpose of a webinar is to share knowledge and increase brand awareness. But the event also has a commercial purpose. For example:
- sell or present a product or service;
- invite to cooperate;
- to force them to sign up for a course, etc.
For example, one of the frequent goals of Ringostat webinars is to invite potential users to a demonstration of our product. When we choose the topic of the event, we immediately think about which of the seven Ringostat products we will promote.
We are looking for potentially interesting topics
- Research trending topics. Once you’ve identified your audience, you need to find out about the hottest topics in your niche. To do this, you can use search engines, social networks, publications in groups of selected niches, or even consult ChatGPT.
- Find the gaps in your target audience’s knowledge. Talk to sales managers in your company. Find out what questions certain customers most often ask, and how they formulate the tasks they want to solve.
- Analyze your competitors. See what topics they raise in their social networks and what events they organize. Make a list of such webinars and see which topics received the most coverage. This way, you will see what the audience is not interested in and what goes over best. But you should remember that everything changes, so sometimes a topic that hasn’t been popular for a year may be interesting now, and vice versa. You cannot blindly copy topics that your competitors have already covered. Therefore, think about how to stand out, address the issue from a different angle, or choose a more specialized topic.

Narrowing down the range of topics and choosing the final option
Once you have chosen your topics, evaluate each one from three perspectives:
- whether it is interesting enough;
- whether it is relevant enough;
- what value it will bring to the audience.
When you are left with three to five topics, consult with your colleagues and the speaker to decide which one is more useful and promising. This is how you will get the topic of the upcoming webinar.
Be sure to make sure that it is worded, short enough, and catchy.
Find a speaker and arrange an event
Where to look for potential speakers
- A list of competitors’ events that were used to choose a topic. You can spy on them and collect a list of opinion leaders who spoke at them.
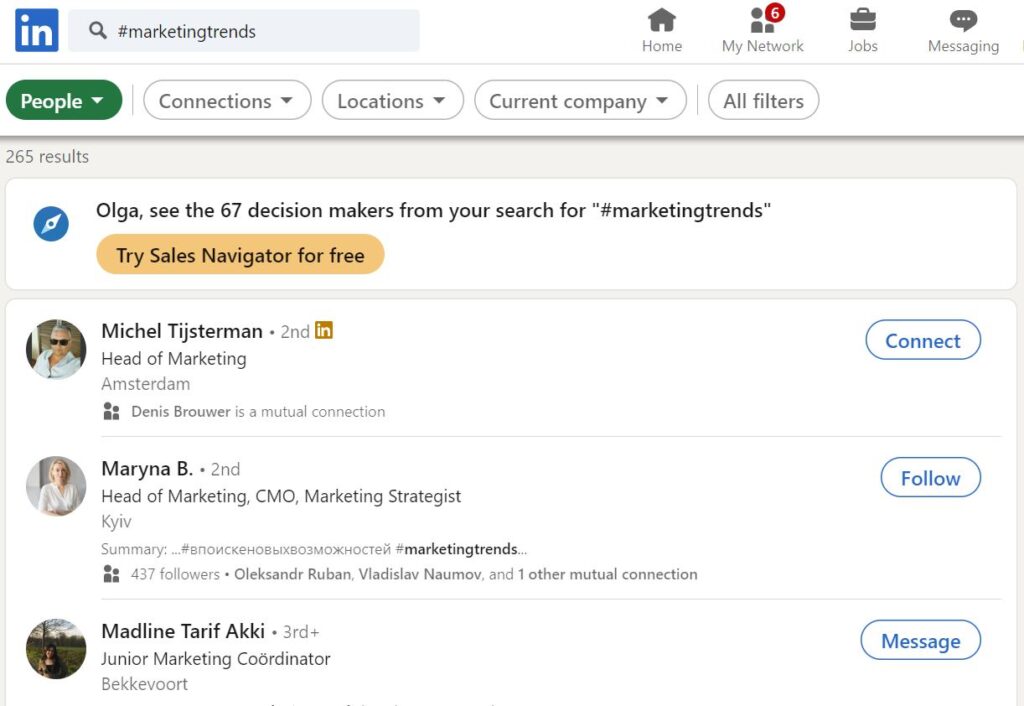
- Social media. We are looking for industry leaders, influencers, and experts on social media: LinkedIn, Twitter, and Instagram. To do this, you can try searching by hashtags — for example, #marketingtrends — or interest groups. Join niche communities and see who posts there most often, whose articles are shared, and who is tagged. If people are actively interacting with the content of an expert, it means that they are worth paying attention to. It also makes sense to subscribe to the social media accounts of top managers of companies whose topics overlap with yours. This is your potential speaker if such a person likes to create content and share their experience.
- Conferences and events. Follow events that take place in the areas you are interested in. Speakers who have spoken there will be able to share useful knowledge with your target audience. In addition, you can often find biographies and contact information of the people who will be speaking on conference websites.
- Google. You can use the search engine to search for content from experts or opinion leaders in a particular field. You can read articles on well-known blogs with related topics, see who the author is, and try to find contacts. This even simplifies the work, as you can immediately understand the potential speaker’s point of view and style of conversation.
- Recommendations. Talk to colleagues and partners and ask them to recommend opinion leaders they’ve heard at events, for example. Or ask them who they know well and would like to hear at an online event.
Once we have a list of potential speakers, we need to go through it and review their experience. Check out their websites, social media profiles, and videos of them speaking at past events — if available. This will give you an idea of their communication style, knowledge of the subject matter, and their perspective on audience engagement.
Making arrangements with the speaker
Once you have selected potential speakers and found their contacts, you can start discussing the upcoming webinar.
- Write an email explaining the details of the webinar. Explain your point of view on the event and ask the future speaker about it. Discuss the topic, format, and target audience. You should also find out about the terms of participation right away so that it doesn’t turn out later that the speaker was expecting to be paid, and you didn’t plan it.
- Agree on the details. These include the date, time, duration of the presentation, webinar format, and final topic. You also need to agree on the agenda, which means what actions are planned, who will do them, and in what order.
- Make a deal. It can be a letter with final arrangements and details of the event. It should contain the terms of the performance and its approved plan.
IMPORTANT: If the future speaker constantly takes a long time to respond to you and “disappears,” it is better to choose another candidate. Even if your candidate has high expertise and a large number of subscribers. Otherwise, they may let you down at the last minute, and the event will have to be postponed or canceled altogether.
Preparing materials
Below I will describe the types of materials we prepare at Ringostat. If you don’t think this or that content is relevant to you, just skip it.
Create a landing page
It is most convenient when you have a standard webinar page structure. In this case, you only need to change the text, creatives, and CTA. With this approach, we at Ringostat create a webinar landing page in just six hours.
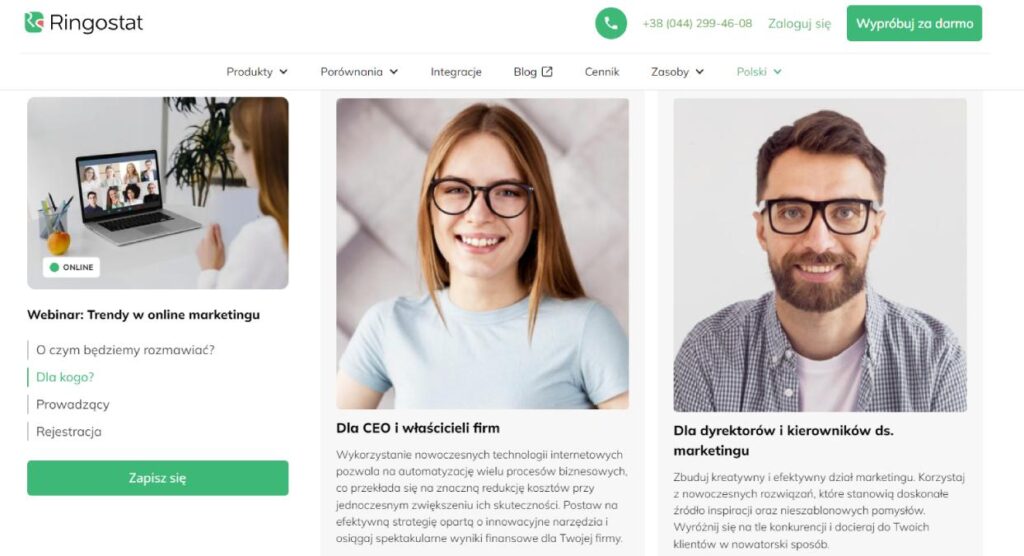
For example, our typical webinar page is built according to one scheme.
- Basic information. The webinar’s name, date, time, a brief description of the benefits the attendee will receive, and a call-to-action button.
- A list of what participants will learn during the webinar.
- Who will benefit from the webinar and why? In the case of Ringostat, these are most often marketers, managers, and entrepreneurs. Here we also indicate the results achieved by our clients.
- Information about the speakers. Photo, name, position, biography, etc.
- Registration form: name, email, phone number, and company of the visitor. Don’t forget to indicate that by leaving the data, the user agrees to its processing.
- Famous clients of your company. Such social proof increases the credibility of you and your event.
Create content for the landing page
To write high-quality content, you need a clear understanding of your target audience, its needs, and pains. This is where the information you’ve already gathered when choosing a topic comes in handy. What issues do potential visitors write and read articles about, what questions do they ask, and what goals do they want to achieve?
When creating texts, avoid long paragraphs or unnecessary information that is not related to the main CTA and distracts attention. Use bullet points to make it easier for users to perceive the information. Place case studies and customer feedback to show users the value of the product if the webinar is directly related to it.
For example, even if the webinar has already taken place, we still leave a link to the case study at the bottom of the page, which contains the figures. In addition, there is a button to contact the company and the data we are proud of. After all, someone may click on the old link, and this content will help to keep the visitor interested:

What you should mention on the landing page
Here, I will go into more detail about what I have already touched on above when describing the structure.
- Title. It should be clear, catchy, and convey the value of your webinar.
- Introduction. The introduction should briefly and clearly describe to the audience what the webinar is about, why it is important, and what problems the participants will be able to solve if they join us.
- Content. In this block, we should outline the main topics that will be covered during the webinar.
- Who will be interested? We need to show the benefits of participation for different groups of our audience: getting new ideas, acquiring practical skills, networking, etc.
- Speakers. Write a brief biography of the speakers, emphasizing their knowledge and experience in the field.
- Benefits. Highlight unique offers: for example, a discount on a product for members.
- CTA. The call to action should be unambiguous and encourage attendees to register for the webinar. Use action-oriented phrases: “register now” or “reserve a seat”.
- Details. In addition to the clear points about the date and time, you should also indicate the duration, and the registration process -— paid or free event, you can specify the location (online).
Create newsletters and social media posts
Letters
Email is your main channel of communication with webinar attendees. That’s why you should be especially careful when writing emails. I advise you to follow a few principles.
- The subject line of the email should contain the topic of the webinar, and each email that will be sent should contain a link to the landing page. The email may end up in spam, the participant will open it a week before the event and will no longer remember where they registered.
- Letters should be short and to the point. Again, long paragraphs and excessive information should be avoided.
- Adding images will dilute the text and make your email more visually appealing.
- You can add materials that will be related to the topic of the webinar and will pique the interest of participants.
- After the webinar, don’t forget to follow up with attendees to thank them for their participation and provide additional resources and information.
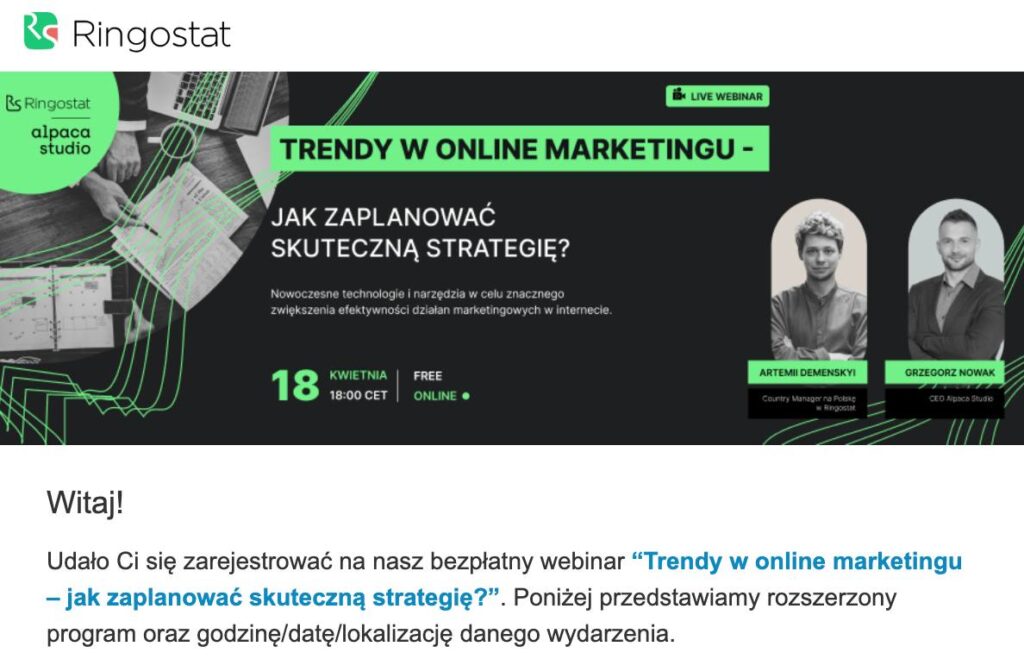
To support the webinar, you will need the following list of emails:
- cold email campaigns — more on this below;
- confirmation of registration;
- a reminder a week before the webinar;
- a reminder the day before the webinar;
- sms campaigns 30 minutes before the webinar — often launched through a mailing list service, so I mention it here;
- a letter of gratitude for the visit;
- a letter asking for feedback on the event;
- registration email to receive a link to the broadcast recording.
Sending such emails should be automated. Relatively speaking, this is a “chain” of emails that starts after the user has registered for the event.
I’m not going to describe in detail how to create an autoresponder, because you can use another service. At Ringostat, we use Sendpulse. You can read detailed instructions on the Sendpulse blog.
Messages for social networks
To save time and have everything at your fingertips, I recommend preparing all the necessary texts in advance:
- text for posts for your social networks;
- text for your social media posts with the last call for registration three days before the event;
- text for the post that will be published after the webinar;
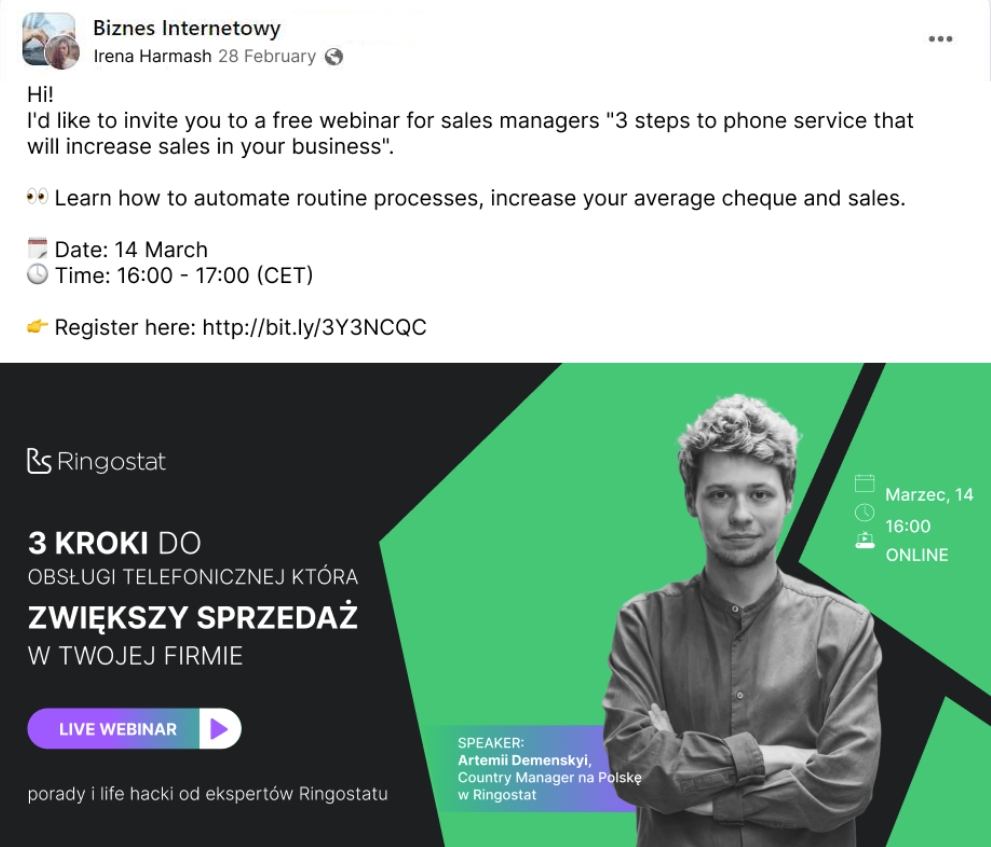
- a post for the speaker’s social media with an invitation to the event;
- a post for info partners – for the same purpose as above;
- messages to invite users collected from competitors’ events – you will send them personal messages;
- a post to invite users, which should be posted by the management and top managers of your company;
- an announcement that you will distribute in thematic groups on Facebook.
A few life hacks to make your text visually appealing
To make text bold on social media, you need to:
- follow the link;
- write the desired text;
- copy it into the post.
I often use it to highlight important information: date, time, language, event name, etc.
To divide the text into bullets, you need to:
- follow the link;
- copy the desired character;
- make everything attractive to our subscribers.
Create a presentation
As with the landing page, it’s best if you have a presentation template for webinars. After all, some elements will be repeated in each event anyway. For example, a slide with information about the company, its services, and products, a slide with speaker data, etc.
- Creating a presentation should begin with identifying the key messages we want to convey to the audience: this will help build the structure.
- As I said above, add information about the company: who you are and what problems you will help solve based on the pains of your target audience.
- Use real-life examples — such as customer case studies — and research on the topic to illustrate your points. Images, graphs, and charts can help you better illustrate your points and help your audience better understand your message.
- End the presentation with a slide with the speaker’s contacts and CTA’s. After the webinar, participants receive an email with the webinar materials. So make sure they have enough information to contact you if they need to.
Developing creatives
Below, I’ll list all the creatives we’ll need and their sizes for standard emails. For example, we use a project in the Figma service for this purpose.
- Creative for the announcement in an article on the corporate blog.
- Banner for a Facebook/LinkedIn post:
- the tape is 1200 x 630;
- the page size is 1080 x 1920;
- Instagram is 1080 x 1080.
- Banner for Facebook/LinkedIn post — for a post three days before the event.
- Banner for the Facebook/LinkedIn post after the webinar.
- Banner for advertising on Facebook/LinkedIn.
- Banner for Performance Max campaigns with a button – this type of advertising is described in detail in the article:
- horizontal is 1200 x 628;
- square is 1200 x 1200.
- Banner for the event on Facebook/LinkedIn:
- elongated is 2012 x 503, or any proportional one;
- high is 1280 x 720.
- Banner for the header of the email with a confirmation of registration for the event is 900 x 325.
- Banner for the email header with a reminder the day before the webinar is 900 x 325.
- Banner for the header of the email sent after the event is 900 x 325.
- Banner for the feedback form is 1600×400.
- The banner for YouTube is 1920 x 1080.
- Pop-up is 986 x 242 + transparent background to fit the screen size of 1920 x 1080. Here I give the dimensions we use, but they may be different for you.
- A plate for a promo code to be displayed during the webinar.
- The background for the stream, i.e. the branded background behind the speaker, is 1920 x 1080.
Preparing articles for the blog
This option is suitable for companies that have enough visitors to their blogs.
- The first article published a week before the event contains its announcement. Here, just like on the landing page, we describe the content of the upcoming webinar, who will benefit from it, the speaker’s biography, etc.
- The second article will be published after the webinar and will tell what the event was about. Since the presentation will be ready in advance, you can prepare such post content before the event. After the webinar, it will be enough to add a CTA and a link to the landing page. There, readers will be able to register to watch the webinar recording.
Looking for an audience
- Advertising. In our experience, this is the most effective channel for attracting participants. To do this, we use Google Ads, Facebook, and LinkedIn, targeting people who are likely to be interested in your webinar.
- Social media. Here we post ready-made posts with details, and reminders, and create events for the webinar. I usually also write to fellow speakers asking them to share the posts with their audience. If the speaker is not from your company, provide them with texts for their organization’s social media.
- Personal contacts. When I create an event on LinkedIn, I invite my contacts to it. You can do the same from the accounts of your company’s top management, if they give you access, and ask for speakers. This works because people see a real invitation from someone they know.
- Networking. Use LinkedIn and Facebook groups to advertise your webinar to the right audience. You can also try contacting info partners and experts in your niche to see if they would be willing to promote the event to their followers. In return, you can offer them to promote their business or content to your audience. For example, by adding information about them to your digest.
- Competitors’ events. Keep track of events organized by other companies. If you join a webinar on LinkedIn in advance, you can later download the participants’ contacts and send them invitations to the event.
- Website. We use a landing page, blog articles, and pop-up forms that pop up if the user spends 30 seconds on the page.
- Existing customers. Write an email with an invitation to be sent by your sales manager. In our experience, existing customers are more likely to attend events.
- Lost leads that are your target audience. Ask your colleagues to upload their database of contacts. In the letter, write that you have already been in contact with them before, but it didn’t work out. If the issue is still relevant to the user, you can learn more at our event.

Cold email campaigns
There are several ways to get it.
- Ask your colleagues for cold bases that were previously used in the company.
- LinkedIn Sales Navigator. A paid service offered by LinkedIn that provides advanced search capabilities and lead recommendations. It can be used to find leads based on their job title, company size, industry, and location.
- ZoomInfo. A provider of B2B contact databases. Here you can find email addresses, phone numbers, and job titles. The service can be used to search for potential contacts based on the following criteria: company size, industry, and position.
- Hunter.io. A tool that allows you to find email addresses for specific domains or companies.
- LeadFuze. A B2B lead generation platform that helps you find emails, phone numbers, and social media profiles. It uses artificial intelligence to search for potential contacts based on predefined criteria: job title, industry, location, etc.
- Clearbit. Helps you find the contact information of your target audience. You can search for contacts based on company size, industry, and other criteria, and then use the data to personalize your outreach.
- AeroLeads. Allows you to find contacts from various sources: LinkedIn, Crunchbase, and AngelList. Contains email addresses and phone numbers.
Some of these platforms are paid or require subscriptions, so you should discuss budgets and plans for these activities in advance. In addition, make sure you are targeting the right audience and that their representatives will find value in your materials and attend the event.
LinkedIn newsletter
We use the Waalaxy tool to set up LinkedIn newsletters.
Install and configure the service
- Log in to your own LinkedIn profile.
- Go to the website, click Go to Chrome store, and install the extension.
- Go to the Waalaxy extension and click “Open Waalaxy”.
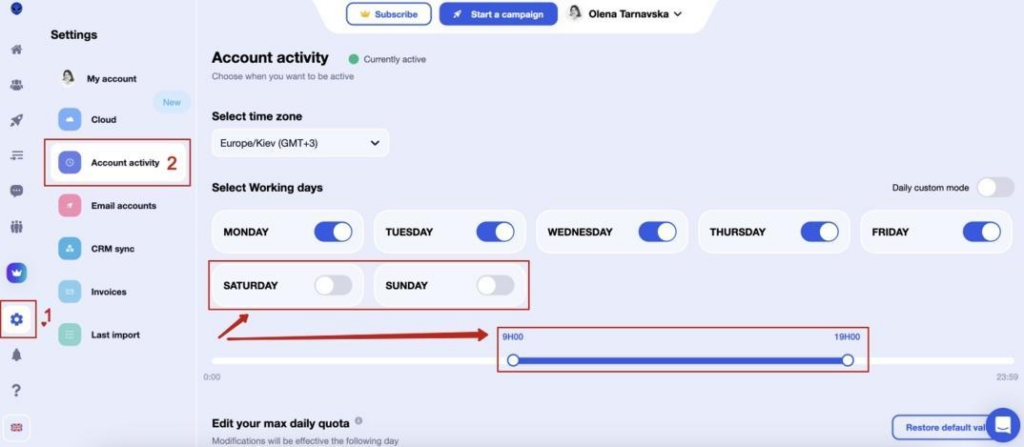
- In the menu that opens, go to Settings and Account activity and configure the working hours for automation.
Add a list of contacts
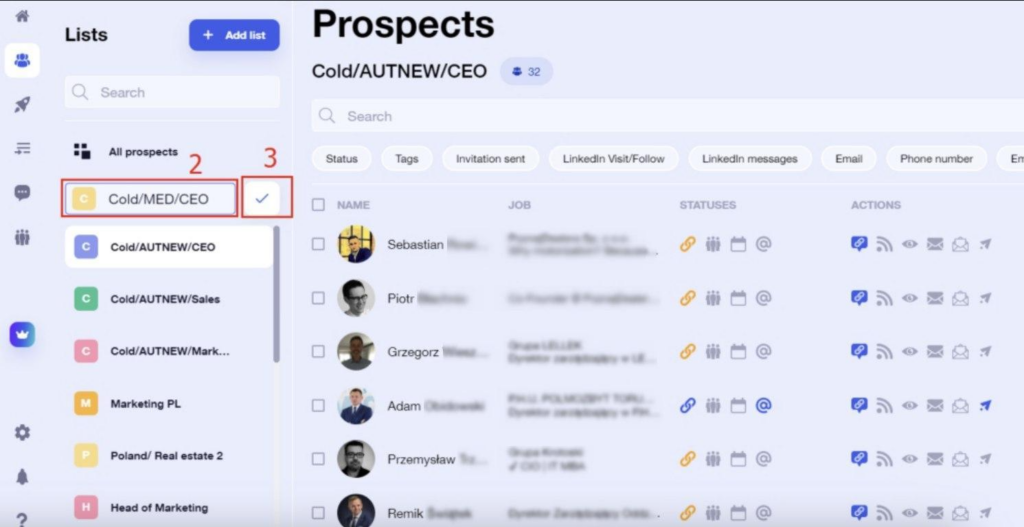
- Go to the Prospects section.
- Click on Add List and do everything as in the screenshot below.
- Import the contact database in .csv format.
Create and launch campaigns
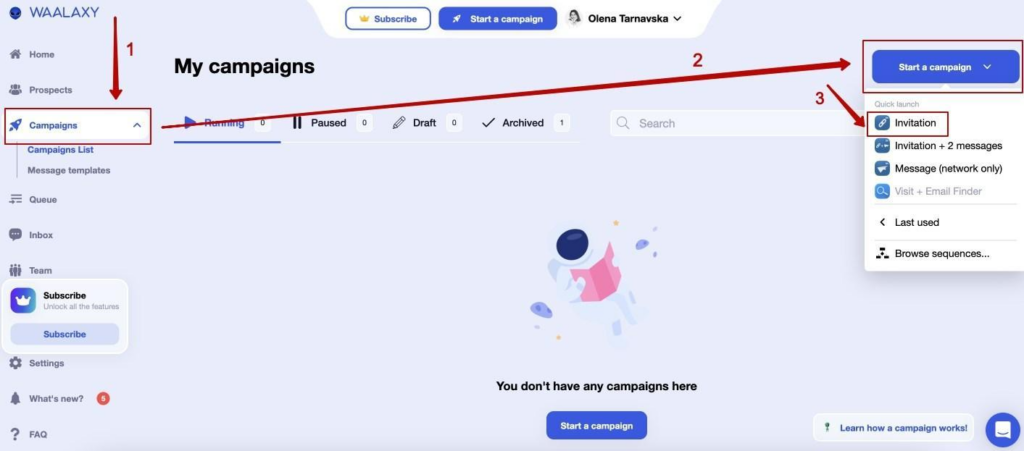
Go to the Campaigns section and add a new campaign, in our case, it will be an Invitation:
Give the campaign a name and add previously imported contacts.

Search for the name of the contact group and add it:

After that, the service will ask us if we want to add text to the invitation. Click “Yes, add a note”.
IMPORTANT: Please note that the text in the invitation does not exceed 300 characters. This is a limitation of LinkedIn itself.
Enter the text and click Confirm. After that, the campaign is ready, and all you have to do is click “Launch my campaign”.
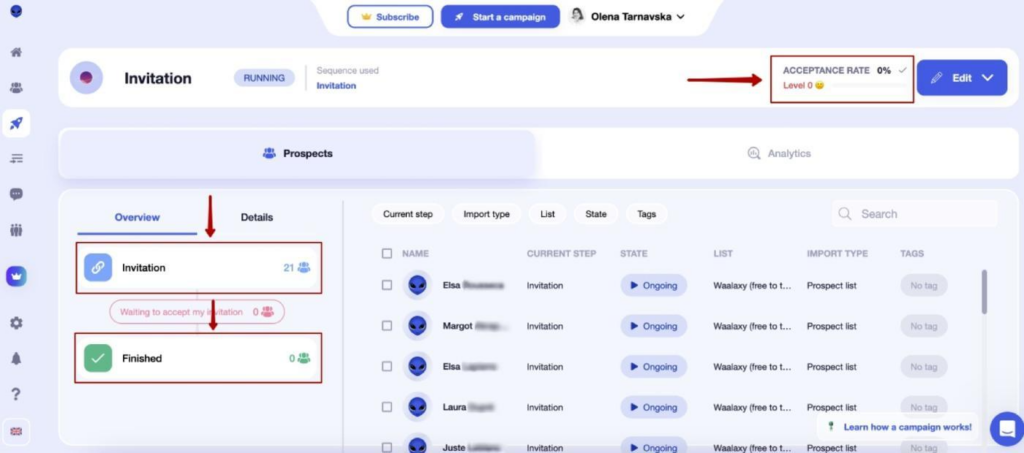
Going to the Campaign list, we can see our active or paused campaigns. Clicking on the campaign itself, we can see the analytics for it: how many messages we send, how many have already been sent, and what percentage of users have accepted our invitation:
Launching a promo
At this stage, we “put into action” everything that we have prepared before.
- When all the creatives for the paid promotion are ready, discuss the audience for the ad launch with the PPC specialist and hand over the materials.
- Create posts on social media.
- Create a video invitation. Record a short video for your webinar and publish it in a pop-up on your website, social media, and YouTube.
- Send out invitations to a cold database of contacts.
- Share information about the webinar in your Facebook and LinkedIn groups.
- Write to specialized media resources whose readers may be interested in your webinar.
- Add a block about the event to your regular newsletter for your subscribers.
- Publish an article with the announcement on your blog.
- Add a pop-up to your website – we do it with the help of the Intercom communication platform.
- Set up a streaming platform. When I was looking for a streaming platform, I tested about 10 and decided on Melon. This is an incredibly convenient and intuitive service that will help you to broadcast without any problems with the full customization of your account. I will write an article on how to use it later. Subscribe to our newsletter so you don’t miss it 🙂
IMPORTANT: don’t forget to add UTM tags when sharing information about the webinar. Without it, you won’t be able to fully summarize the webinar and identify the most effective traffic channels.
Actions on the day of the webinar
We’ve come a long way and finally our day X has arrived. The preparations may have been a bit complicated, or they may have been easy. Either way, thanks to the careful planning and organization we’ve done, we can be sure that the webinar will go perfectly. But let’s not get too excited yet 🙂 Let’s take a look at the last steps that need to be taken before the event.
Check the work plan and materials
Go through your calendar with tasks, I provided a template at the beginning of the article. And make sure that each task is completed.
Take a final look at your prepared presentation and materials to make sure everything is in order. Rehearse the presentation to make sure you are on time and can accurately answer any additional questions about the materials — if any. It’s best to schedule a test stream a few hours before the webinar to run through everything and make sure everything is flawlessly prepared.
Contact the speaker
Write to your speaker. Believe me, they are as nervous as you are. Ask how they are feeling and if they are ready to speak. You have already prepared so much together, so you should remember that you are a team and support each other. Advise them to have a glass of water nearby and to make sure the workplace is well-lit.
Check out the streaming platform
You should also conduct a test stream to check the equipment. Everything is fine with the camera, microphone, internet connection, and the platform itself.
Schedule an SMS
Participants have already received several email reminders about the event, but I recommend reminding them about the event half an hour before it.
I usually useSendpulse for this reminder. We check phone notifications more often than emails, so there is a higher probability that a registered user will join. How to send such a campaign is described in the instructions on the platform’s blog.

An example of setting up an SMS campaign to remind you that the webinar will start in half an hour
Come in early
It’s never a bad idea to double-check that everything is working properly. Log in to the webinar platform 20-30 minutes before the scheduled start time to make sure everything is set up. You shouldn’t go live until 3 minutes before the event starts. A few minutes will be enough to welcome participants who joined earlier.
Interact with participants
During the webinar, you should communicate with participants by answering questions, solving problems, and providing additional information. If you are not sure about the audience, prepare a list of frequently asked questions in advance and ask your colleagues to be active in the chat.
This will give the audience the feeling of being alive and encourage other users to feel free to ask questions. Make sure to keep your audience engaged throughout the webinar.
Record the webinar
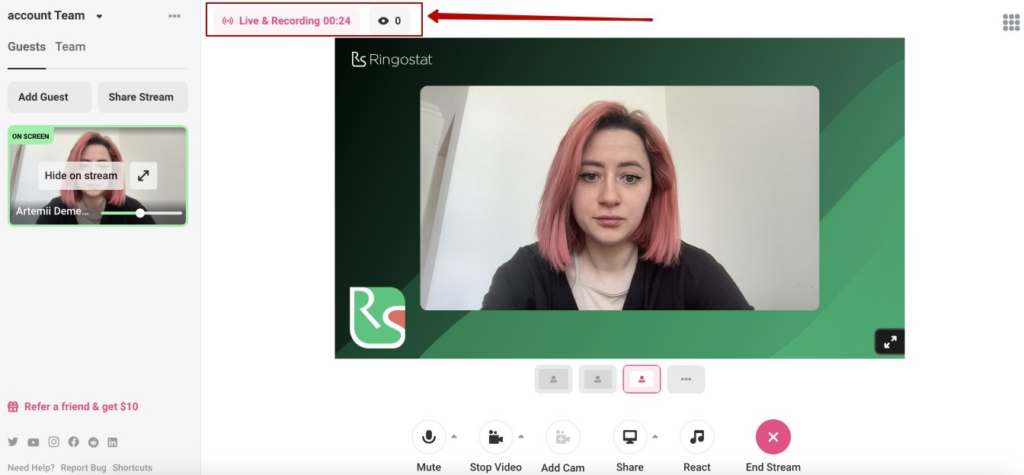
The Melon platform we work with starts recording as soon as we go live. However, I advise you to make sure that the recording has started. You can see it in the upper left corner of the screen:
If your colleagues are guest speakers at someone else’s webinar, it’s better to record the stream from your side and later share it with your partner.
Actions after the event
A successful webinar is not only a great achievement, but also a huge amount of effort that you put in. Before you go celebrate your success, there are a few more steps to take. I promise they will be the last.
Stop the promo
- Remove the webinar registration pop-up from the site.
- Stop all paid promotions for the webinar.
- Stop invitation emails.
Upload the video to Youtube
After the webinar, you need to download the video from your streaming platform and edit it, removing bad moments and adding, for example, an introduction at the beginning.
If we are satisfied with the video right away and do not re-upload it, the link remains the same as the one we sent toin the invitation
If were-upload the video, we’ll need a new link to send emails thanking you for your participation.
Send follow up
Follow-up of participants takes place in two steps.
- A thank-you note for participation. Thank the participants for joining and send them the webinar materials for detailed review. Do the same for people who couldn’t join for one reason or another. Send them a link to the recording of the webinar, the presentation, and any other additional materials used in the webinar.
- A form for collecting feedback. This will help you plan future events. You will be able to better understand what worked well, which of the topics covered were most interesting, and what can be improved.
Change the form text on the landing page
We have already created a registration form and linked it to the landing page. So all we have to do is change the text from “You have successfully registered. See you live” to “Thank you for registering — your link to the recording is in the mail”. Next, make sure that people who fill out the form will receive an email recording. It’s easy to do in your email marketing service settings. Also, don’t forget to add your webinar attendees to your general contact database. You can use these contacts for other campaigns.
You should also think about attracting new audiences. You can share the link to the webinar recording on social media, on your blog, and try running a promo if you think it’s effective.
Also, don’t forget to pass on the webinar leads to your sales team. People who are interested in your topic are likely to be interested in your products. To transfer leads, download their contacts that you received from the registration forms and pass them on to the people responsible for processing them.
Analyze the webinar and consider improvements
We’ve worked so hard to get the result, so you need to analyze the effectiveness of the webinar. You need to understand how well it worked and how many leads your work brought.
Here you will find a template with metrics for analyzing the webinar.
When preparing for events, we all make mistakes and gain a lot of valuable experience. I advise you to write down interesting insights and observations that come during the preparation. It is also worth returning to our analysis and writing down what worked best to engage the audience, what should be developed, and what should be eliminated.
Remember: no matter how much you prepare, everything that can go wrong will go wrong. So don’t be disappointed if something doesn’t go according to plan: it will definitely get better.
I hope this checklist will simplify your work and help you improve the quality of your events.

