Ringostat Smart Phone is a cross-platform application for calls, chats, CRM and real-time analytics. With it, you can access full-fledged business telephony wherever you are — in the office or out of it. Read our in-depth review of Ringostat Smart Phone’s features to help your team work conveniently and productively daily.
- What is Ringostat Smart Phone
- Getting started with Ringostat Smart Phone
- Part 1: Working with calls
- How to call a customer
- How to automatically dial customers with Power Dialer
- How to receive a call
- How to hold a call
- How to transfer a call to a colleague or an entire department
- How a soft call transfer works
- Additional convenience for call transfer
- How to work with call history
- Missed calls
- How to work with your contacts
- Part 2. Working with text messages
- Part 3. Insights about customers and methods of increasing the check
- Part 4. How to flexibly configure Ringostat Smart Phone
- Additional features
What is Ringostat Smart Phone
Ringostat Smart Phone is an application that works on macOS or Windows laptops and computers and Android or iOS smartphones. It allows you to:
- make and receive calls;
- correspond in a single interface with users of Viber, Telegram, Messenger and visitors who write to the chat on your website;
- instantly go to transactions and contacts in CRM during the call;
- see valuable insights about customers before you even answer the call — which will help you close deals more likely.
If we talk about the mobile version of the app, it provides businesses with additional advantages:
- contains almost all the features of the desktop one — so you get full-fledged business telephony right in your pocket;
- allows you to always stay connected — because it works perfectly on mobile internet;
- calls of employees who are at the workplace and out of it are united into one business telephony and detailed statistics are collected on them;
- allows you to work from anywhere without being tied to the office;
- saves smartphone battery power.
The article explains the advantages of the mobile application. Then, we’ll move on to the options that both the mobile and desktop versions contain.
Getting started with Ringostat Smart Phone
The application is part of the Ringostat Intelligent Business Phone System. Therefore, you need to connect to use it. In our telephony, three workplaces are available by default for Ringostat application users. If the same user uses both the desktop and mobile versions, it is considered one workplace.
To start using the app, download it to your device from the website. Authorize the application using a login and password, which will be provided to you in advance by the Ringostat support. You can also log in to the app using your Google account or Apple ID.
First, let’s take a look at the top panel. The app can be:
- minimize;
- pin it to a certain side of the screen — on the right or left side;
- change the size of the window, setting it to a size that is convenient for you;
- close.
If the Internet or the microphone is down, notifications will appear at the top of the interface.
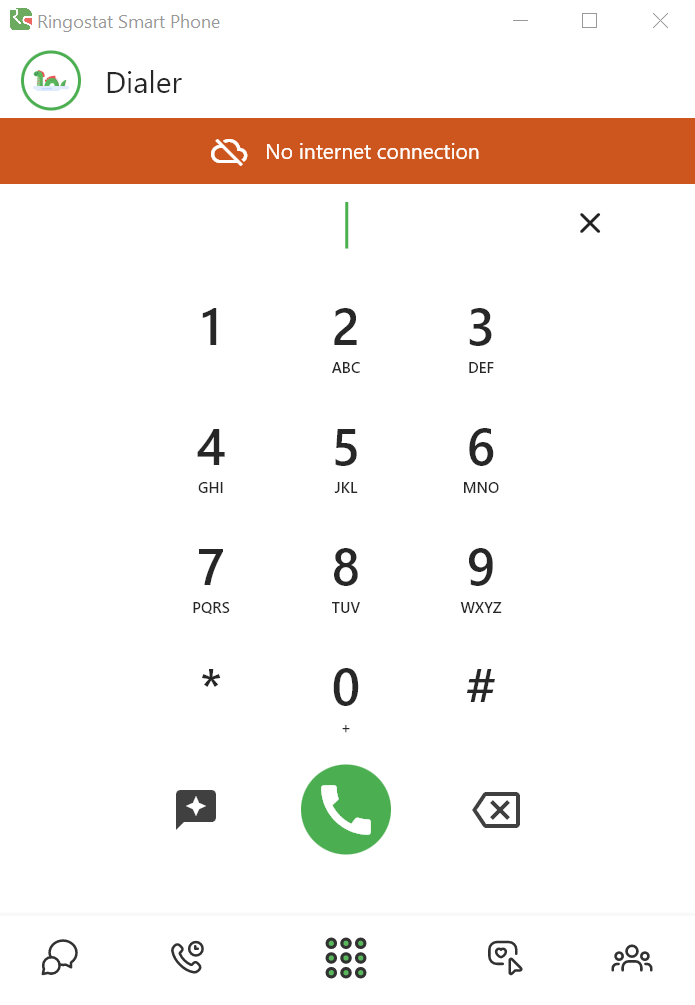
The bottom panel of the app also has sections, each of which we will discuss in detail later.
These are:
- messenger;
- call history;
- interface for dialing the number;
- information about customers on the website;
- contact book.

How to access the mobile version of the app
- Download the mobile version here, selecting iOS or Android.
- Open the application on your smartphone and log in. Like on the desktop version, you need to enter your SIP account name, email, and password, or log in with Apple ID or Google.
You can be logged in on several devices simultaneously, but you must use different SIP accounts for this. One user (one workstation in a virtual PBX) can have three accounts. A smartphone SIP account must have special access to your personal account. Our technical support will set it up for you. This is very convenient if, for example, you need to leave the office for a while. While away, you can communicate with customers using the app’s mobile version. And when you return, you can immediately continue working with the Ringostat desktop application.
Part 1: Working with calls
How to call a customer
There are three ways to dial a number.
- Copy the desired number and paste it into the input line.
- Enter the numbers on the Ringostat Smart Phone keyboard.
- The fastest option is to click on the number posted on any website, and the app will automatically dial it. This method is currently available only for the desktop version of the app.

You can also make calls directly from the CRM, for example, from a contact card that contains a customer’s number.
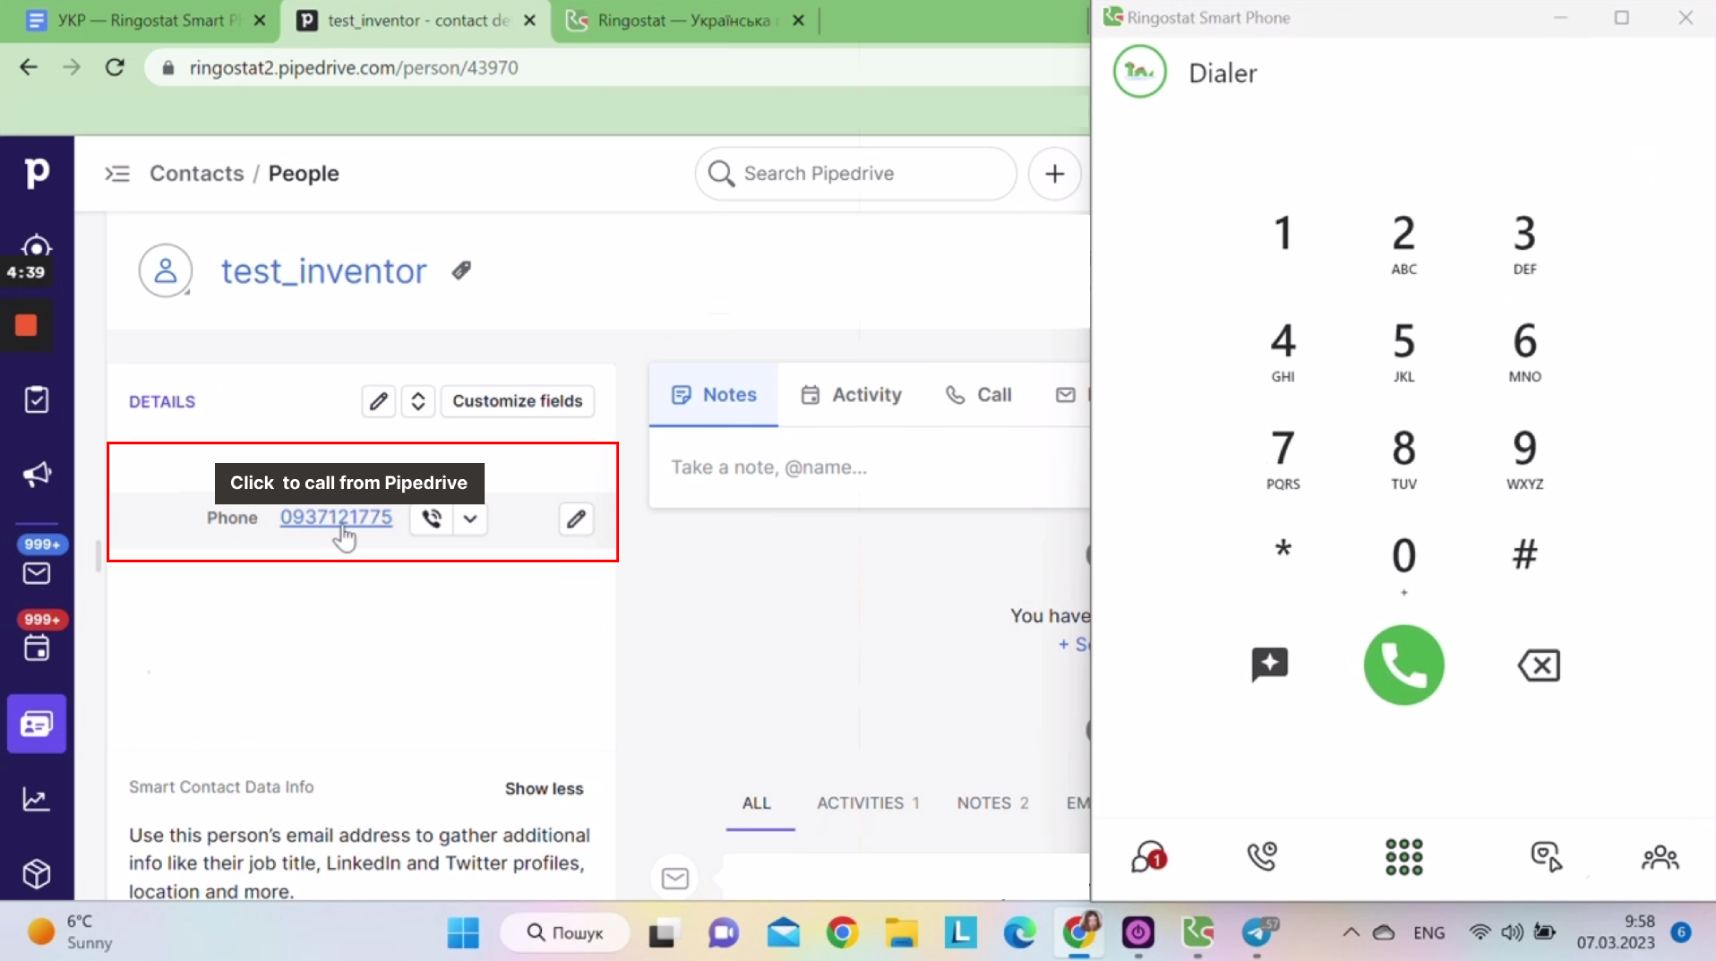
As you can see, Ringostat Smart Phone is specially designed not to cover essential fields in CRM. Just pin it to the right side of the screen.
How to automatically dial customers with Power Dialer
Power Dialer is a feature that allows you to call customers quickly. It will enable you to save 5-7 seconds for dialing each number. This is a lot when you need to call dozens of customers.
The solution is configured in the Settings — Ringostat Smart Phone Settings — Power Dialer section. It works like this:
- the project administrator uploads a campaign to Ringostat with a list of numbers to be called by the employee who are assigned to do so;
- grants access to the employees who will make the calls;
- after that, Power Dialer appears in the applications of the assigned operators;
- to start calling, the employee should press the “Play” button in the Power Dialer;
- after that, the functionality connects them to all contacts in the list in turn;
- when dialing a number, the client’s name is displayed if it is in the list of numbers;
- when the operator hangs up, Power Dialer pauses for a few minutes and starts dialing the following number — this timing is set in the settings and can range from a second to 300;
- if an employee needs to leave, he or she can pause the automatic call.
You can create multiple campaigns at the same time. Drag up the ones that you want to process first. When Power Dialer finishes calling one campaign, it will move on to the next one.
Read more about this helpful functionality in the article “Guide: how Ringostat Power Dialer works in the application for calls and CRM”.
How to receive a call
When you receive an incoming call, you will receive a pop-up notification about the call, even if Ringostat Smart Phone is minimized or closed. The user only needs to be logged in. After expanding the app, you will immediately see the customer’s phone number.
If you have CRM integration set up and a customer who is already added to it calls, a pop-up push notification will immediately show their name. Currently, this is implemented only for the desktop version. You can also see the name when you go to the app by clicking the pop-up notification. This also works on the mobile version of the app.
Clicking on the push notification opens a more detailed menu.
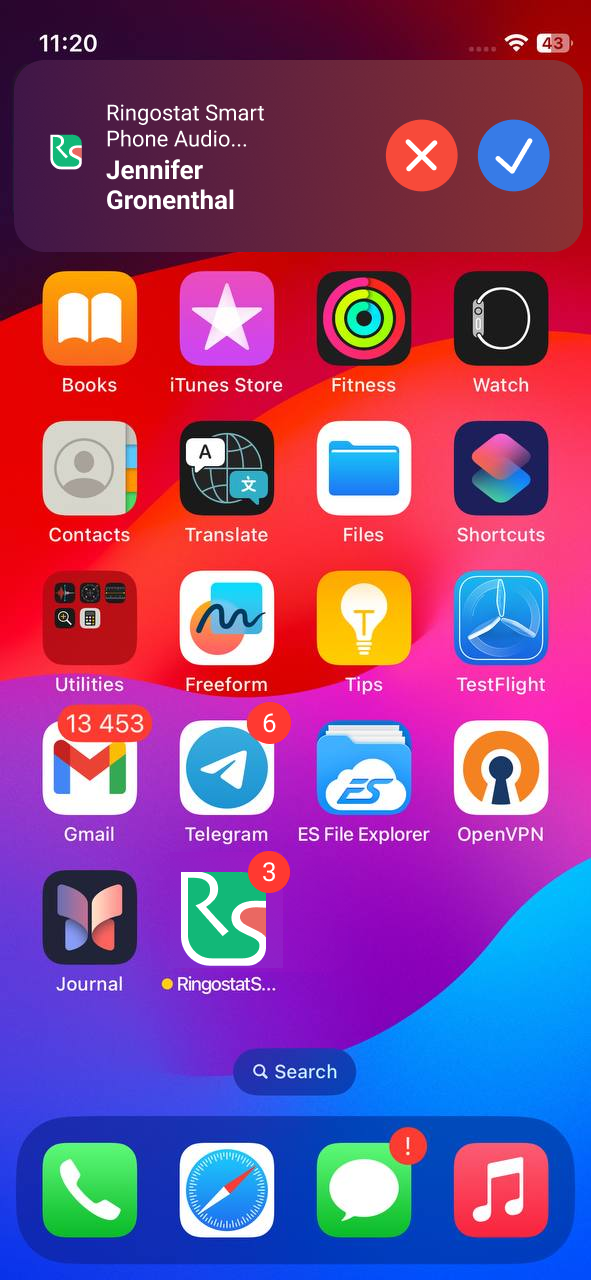
What you can do about the challenge
Accept or reject:

Create a contact:

Transfer an incoming call to a colleague:
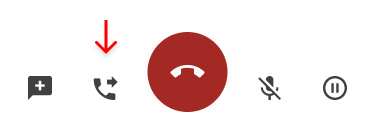
Mute — so that the interlocutor doesn’t hear what the operator is saying:

Put a call on hold — more on this below:

You can also go to the dialing menu:

Make a new call:

How to hold a call
We’ve already mentioned that the customer will be put on hold when you click on the pause icon on the bottom panel. This is convenient, for example, if you need to clarify something.
You can also put another call on hold and switch between the two calls. In this case, the active call is put on hold, and the one you are switching to becomes active. You can also put this call on hold if you need to.

You can hold up to five incoming and outgoing calls at a time.
How to transfer a call to a colleague or an entire department
There are situations when one employee answers the phone, but a colleague better handles the client’s question. Or a potential buyer accidentally calls the sales department but really needs accounting. With Ringostat Smart Phone, the call can be transferred quickly and easily.
There are two options for this: standard and soft call transfer.
How a standard call transfer works
A standard call transfer is required when simply forwarding a call to someone else is enough. No additional actions are required.
How to do it:
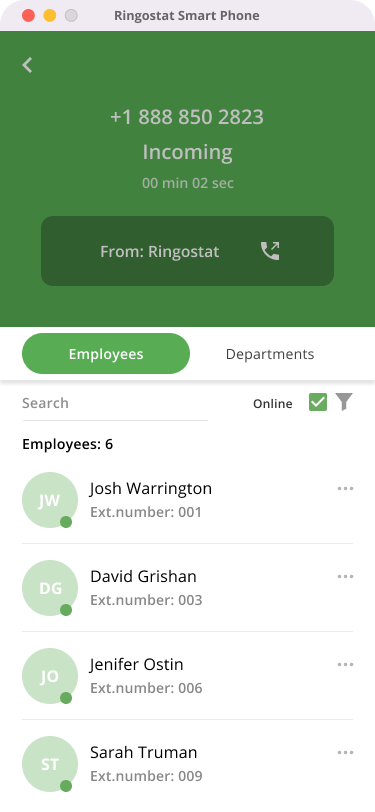
- during an incoming call, press the handset icon with an arrow — as we showed above;
- a menu will appear where you can select a colleague or department from one of the tabs;
- you can enter the names of your colleagues or departments in the search bar:
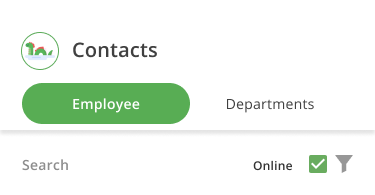
By default, only those who are currently online are visible — you can uncheck the box if you wish:
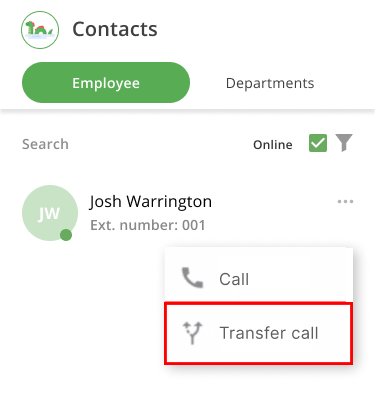
After selecting a department or colleague, click Transfer Call.
How a soft call transfer works
Sometimes, before transferring a call, you need to talk to a colleague or department first. For example, you might need to quickly describe a client’s request or warn them about some important nuances of a deal.
To do this, press “New call” and select a colleague to call from the list that appears.Talk to the employee, while the client is listening to pleasant music — the call will remain on hold. After that, the client can be connected to the manager.

Additional convenience for call transfer
- You can call the dial pad without closing the call transfer window.
- When the list of colleagues to whom you can transfer a call opens, you can see information about the manager.
- You can transfer a call to a SIP account or any number. Click Contact information as described above, and you will see a list of destinations added to the employee. This way, you can transfer a call not only to their SIP account but also to their cell phone number. If you click “Transfer call”, the call will be forwarded to SIP.
How to work with call history
Go to the Call history section. It is divided into two tabs: “My calls” and ‘Missed calls’.

My calls
Here, you can see the calls that you made. For each call, you can see:
- status — if you click on its icon, you can see a tooltip, as in the screenshot below;
- phone number;
- the duration of the call;
- date and time when the call took place.

Click on the number, and you will see an additional menu. From there, you can call, view insider information — we’ll talk about this later — or copy the number.
Missed calls
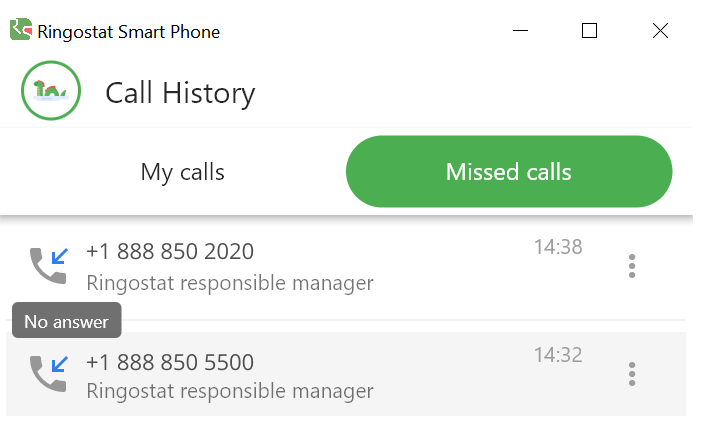
Missed calls are displayed here, for which all project managers have not called back to clients. For each call, you can also see:
- the client’s number;
- the date and time of the failed call;
- instead of the duration of the call, the name of the call forwarding scheme under the phone number.
If you missed a call and not the entire team, missed calls are also displayed in the “My Calls” section. They are highlighted in red, in contrast to a successful call, which is marked in black.

How to work with your contacts
Your Contacts list contains three tabs:
- clients;
- employees;
- departments.
Let’s take a look at what options each of them contains.
Clients tab or Ringostat mini-CRM
The contact book also contains the Clients tab, which is a mini-CRM that will be useful if:
- you don’t have a traditional CRM where you can store contacts;
- you would like to have contacts from your CRM to call them.
Mini-CRM is incredibly convenient for smartphone users. After all, they are uncomfortable entering a CRM, searching for the right contact, copying it, etc. Therefore, users of the mobile version of the Ringostat app will definitely appreciate this functionality.
Contacts can be added to this tab in two ways:
- you can add them manually;
- if you have a CRM and have configured its integration with Ringostat, the contact information and customer names will be automatically pulled from it.
Contacts can be created during or after a call with a customer, edited, and added to an existing contact from the:
- the call screen;
- call history;
- an open dialog in Messenger;
- the section “Customers on the website”— in addition, if you have specified the customer’s name, this information will be displayed in this section.
In addition, by clicking on the client’s phone number, you can perform the following actions:
- call;
- send an SMS;
- see the insider information collected by Ringostat: the last page visited by the customer, in which city and country they are located, from which advertisement they came, how many times they visited the site, etc.;
- see details about the contact.
The article “Ringostat mini-CRM: a handy tool that is always at your fingertips” explains the advantages of the Customers tab.
How to call other managers using the Employees tab
At the top of this tab is a search bar where you can enter the names of your colleagues. By default, only online managers are visible. But if you want to see everyone, just uncheck the box.
You can also click on the filter to select employees from specific departments.

Here you can see the list of colleagues, where you can see each of them in a collapsed form:
- first name, last name — the way you specified them when creating “Employees” in Ringostat;
- the colleague’s extension number — the client can immediately contact a specific manager by dialing this number in the voice menu.
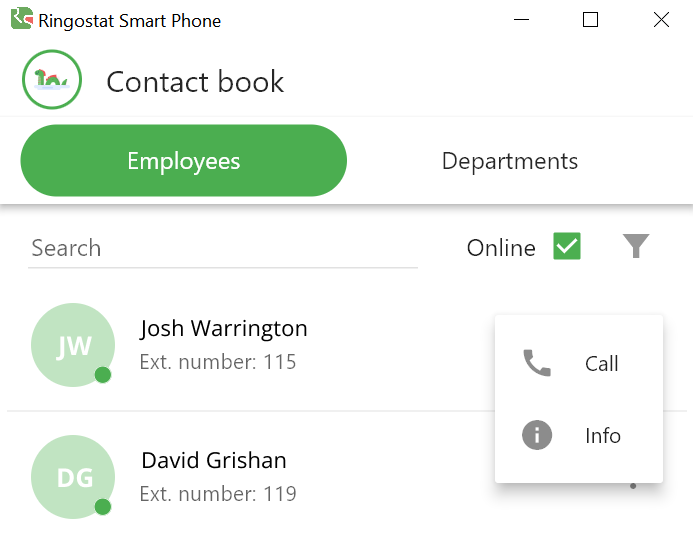
You can call the colleague by clicking on the handset icon next to his or her name. You can also view additional information about the manager by clicking on his or her name: SIP account, phone number, email, etc.
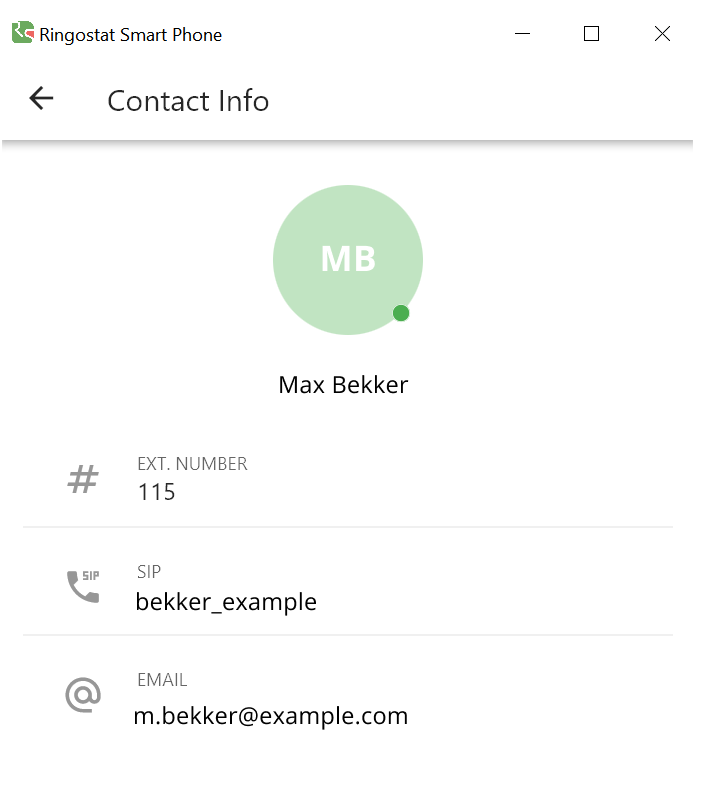
Departments tab
This tab contains a list of all the departments of your company that you have previously created in the settings of your Ringostat personal account.
You can call all department employees at once by clicking on the handset icon next to the department name.

Part 2. Working with text messages
How to communicate with people from different messengers in a single interface
Go to the Messenger tab, where you can process messages from customers who write to you in one window:
- Telegram;
- Facebook Messenger;
- Viber;
- chats on your website — Ringostat must install them for this purpose.
We recommend reading the article “Ringostat’s live chats — a fast, flexible, and client-focused website communication solution.”
You will receive a push notification when a customer writes to you. In the bottom panel, before switching to the Messenger tab, you can see how many requests are waiting in the queue.

You can also see the number of requests for correspondence in the top bar after logging in to the Messenger tab.

Click on “Accept dialog” and we see:
- all dialogs that are waiting for our response;
- the last message in each dialog;
- a red mark — if the last message was from the current client;
- an icon showing where the client wrote to — Telegram, Facebook, Viber, or chat.

Let’s go to a dialog with the client.

Here you can:
- reply;
- download previous dialogs with the user by clicking on the icon in the upper right corner;
- save his contact in the mini-CRM;
- request the user’s phone number;
- view information about the client from Insider by clicking on the three dots next to the name at the top of the interface;
- close the dialog;
- return to the list of all dialogs assigned to the manager;
- transfer the dialog from chat to another employee, as shown below.
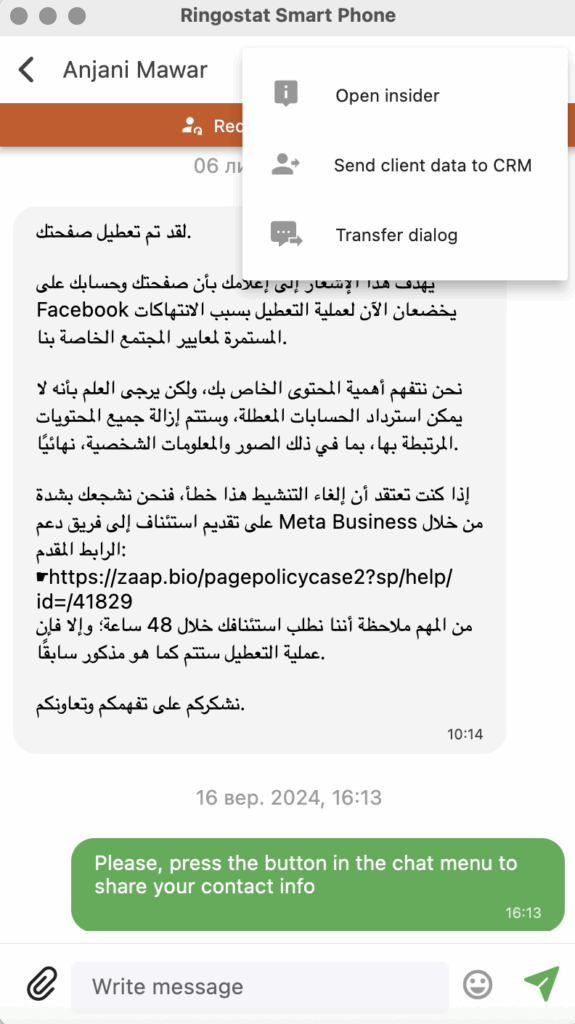
Also, Zoho users can create a lead in this CRM system right during the correspondence. To do this, you need to request the customer’s data, and then the “Send customer data to CRM” button will appear.
Later, this feature will be available to users of other CRMs.
Statistics on closed customer dialogs are also displayed in a separate Ringostat report, Message log. You can read each dialog by clicking on the date and time of the conversation.
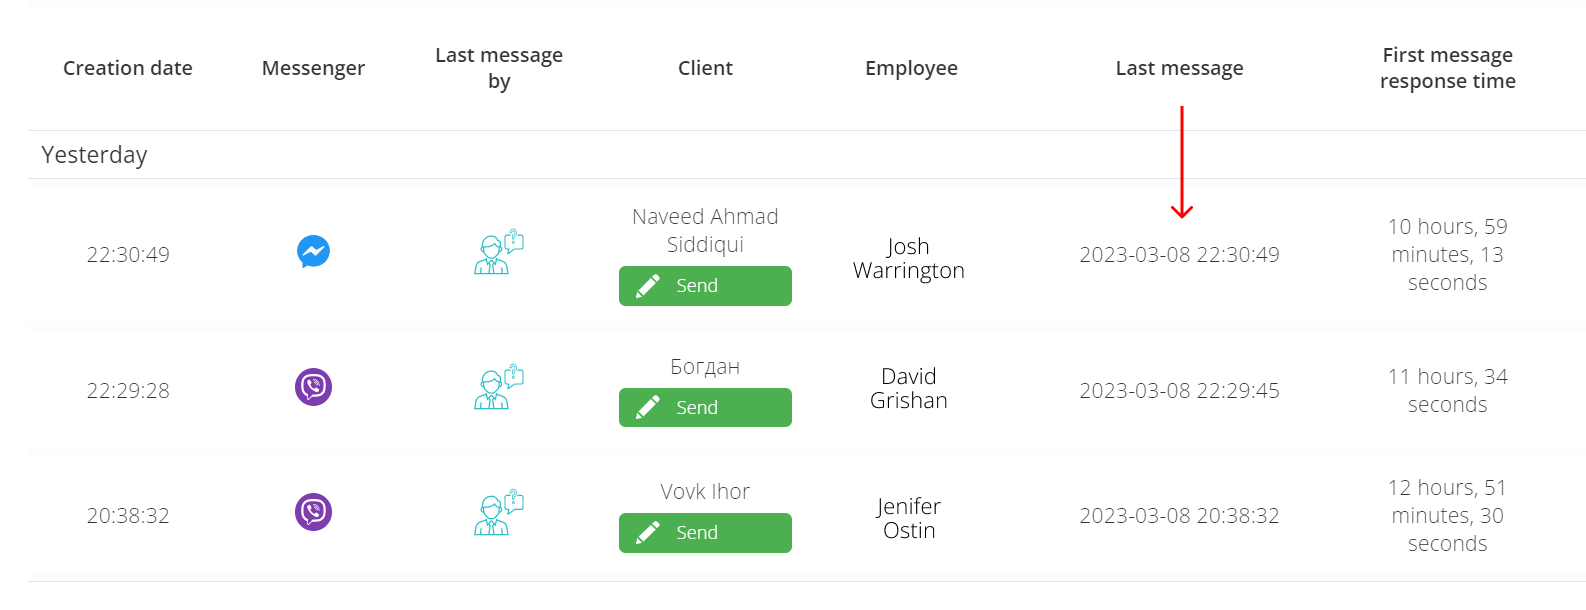
Part 3. Insights about customers and methods of increasing the check
What insights can be seen about a customer during an incoming call
You can get valuable insights about a customer before you even pick up the phone. This will help you to immediately orient yourself on how to build a dialog. It will also allow you to “read the customer’s mind,” so to speak, which will increase your chances of making a sale.
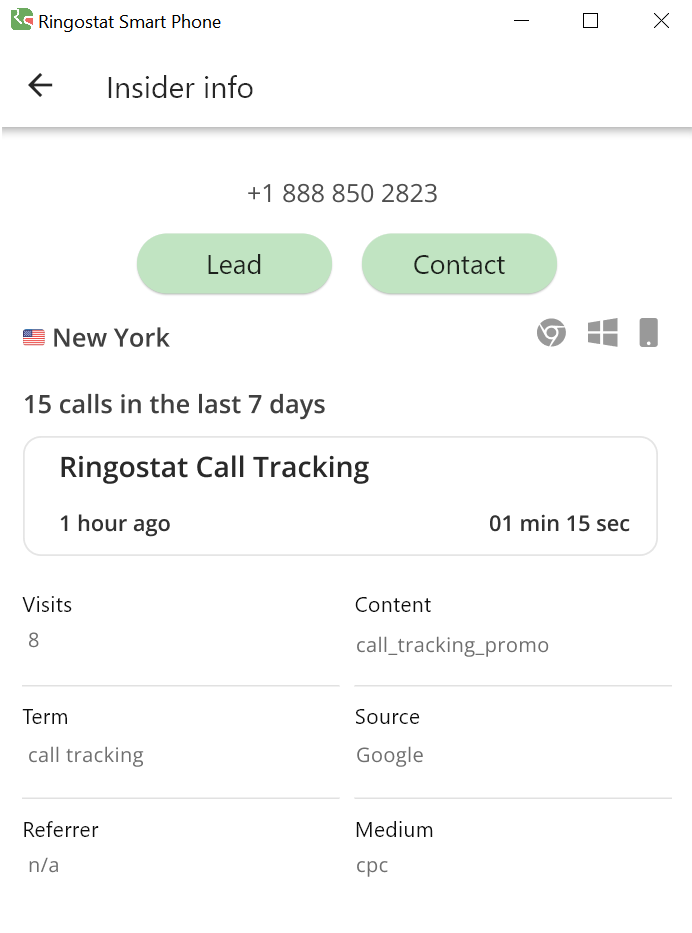
For example, we received a call from a client. Click on the number and “Open Insider”.

What the insider information will show:
- name, if the user is already added to CRM;
- phone number;
- buttons to go to the deal in CRM, lead or contact card;
- user’s location;
- browser type;
- device;
- number of calls in the last seven days — you can change the period in the settings;
- the last page the customer visited on your website and how long they spent on it;
- number of visits to the website.
IMPORTANT: You can also access the deal or contact card in CRM from the app’s mobile version. To do this, you must have the CRM system’s mobile version installed on your smartphone.
Let’s take a closer look at other metrics.
- Source — in the example below, it’s Google. That is, it was this system that brought us the client who called. It can also be, for example, Bing or Facebook.
- Channel means the path that led to the call. On the screen, we can see that the user came from CPC, i.e., contextual advertising. However, channels can also include email, organic search, etc. So, you already know roughly what type of your content the potential buyer encountered.
- Group of ads if the user came from contextual advertising. For example, if you see that the ad group here is “Promotion”, the person is unlikely to expect a big check.
- The keyword is if the user came from contextual advertising. This way, you can understand the customer’s request. In the screenshot below, you can see that the person was looking for a “soft phone,” meaning this product interests the user. Knowing this, the manager understands where to start the conversation, what features to emphasize, and more. By “guessing” the user’s thoughts in this way, you increase their loyalty — and, with it, the chances of closing a deal.
- Source of conversion. If the user came from a specific website rather than an ad, you can see which one. It can also tell you what exactly interested the user.
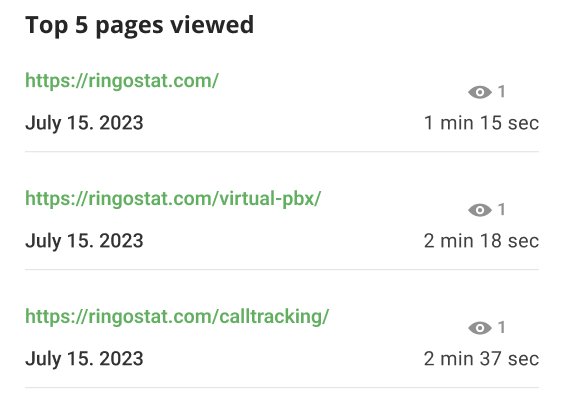
- The top 5 pages most often visited by the client will help you better understand what they are interested in. For example, which products they have viewed many times.
- A list of all sessions for a given period: date, location, device, browser, etc. You can see detailed information about each session by clicking on the arrow next to each session.
Also, by clicking the icon below, you can access the card of a specific call in your Ringostat personal account. There, you will find detailed information about the call.
How to see which customers are currently on the site
Go to the “Customers on the site” tab.

This section displays users who have already called you and are currently on your site.
IMPORTANT: If a visitor has not called you yet and is currently on the site, they will not be seen in this section.
For each user, you can see:
- phone number;
- the page on which the client is visiting;
- how long the visitor has been on the site.
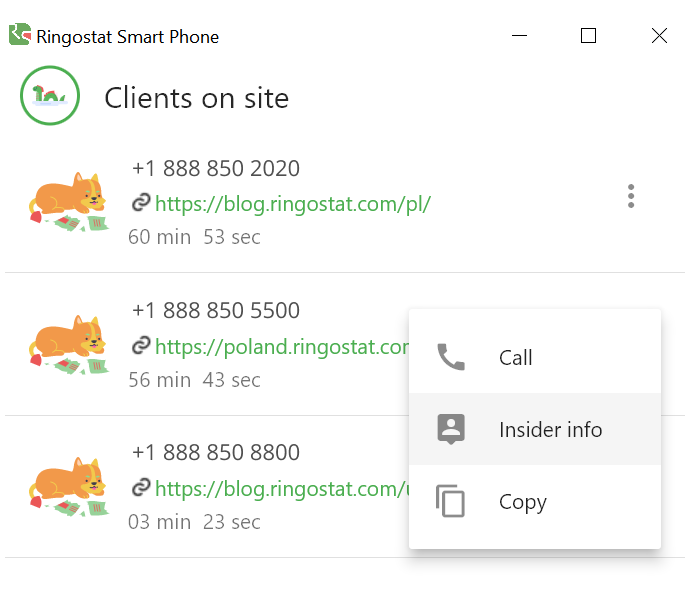
By clicking on the number, you can:
- call the user;
- view the information in Insider — as we showed earlier;
- copy the number.
Part 4. How to flexibly configure Ringostat Smart Phone
Clicking in the upper left corner opens additional Ringostat Smart Phone settings. Let’s examine each one.

Accessibility
The top part is responsible for the accessibility of your account. For the desktop version, you can choose the following options:
- online;
- do not disturb for an hour
- do not disturb all day — that is, the manager will be available the next day;
- do not disturb.
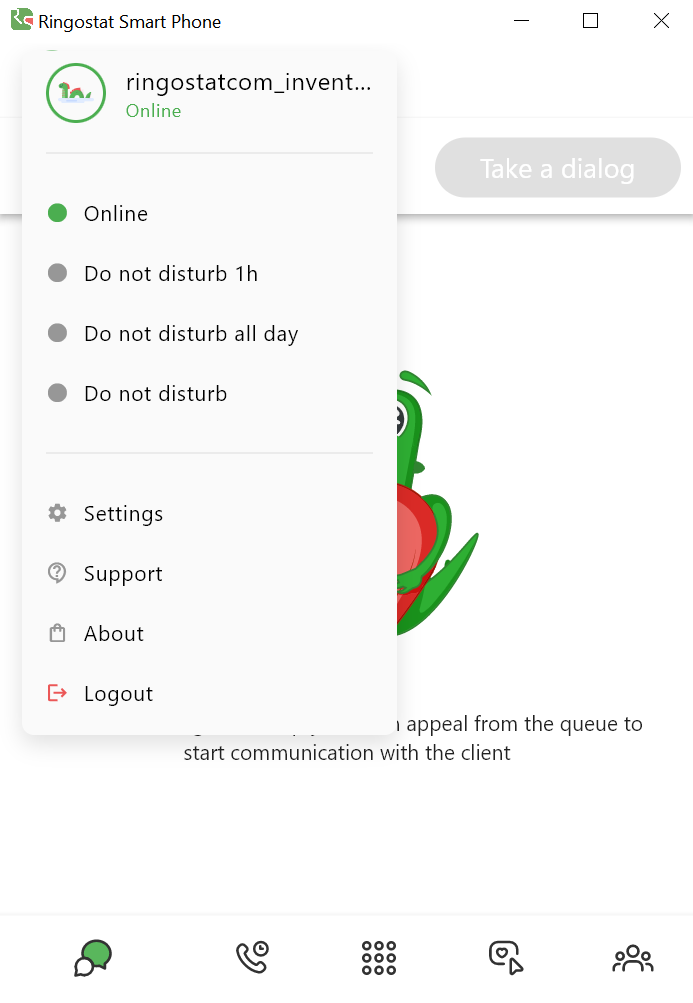
You can select the “Online” or “Do Not Disturb” statuses for the mobile version. When you switch to the latter status:
- the app does not receive incoming calls;
- it is possible to initiate outgoing calls;
- you receive push notifications and messages in messengers, as well as notifications about a new dialog in the dialog queue.
Settings
App settings
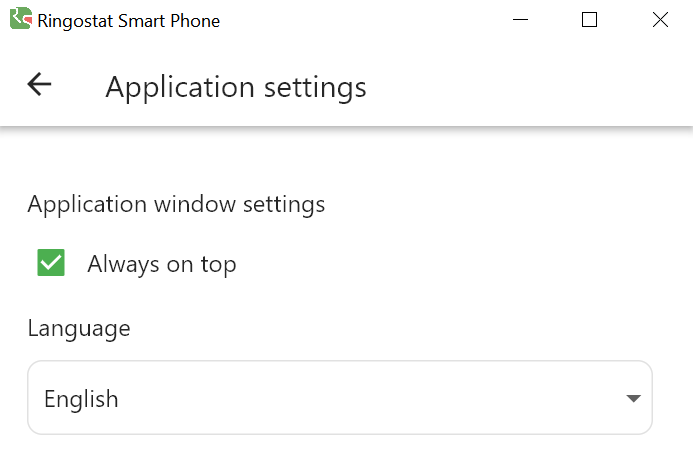
- You can uncheck the “Always on top” box to make the app appear in the background when using other apps.
- Different interface languages are available.
Notifications and sounds
Ringostat Smart Phone automatically checks which devices you have connected and allows you to choose the right ones. You can also change notifications and sounds.

Setting up a ringtone
In the ringtone settings, you can:
- leave the default sound or upload your own audio;
- set the volume.
Setting up notifications
In the notification settings, you can optionally disable push notifications for the messenger.
Insider settings
In the next section, you can change Insider settings.
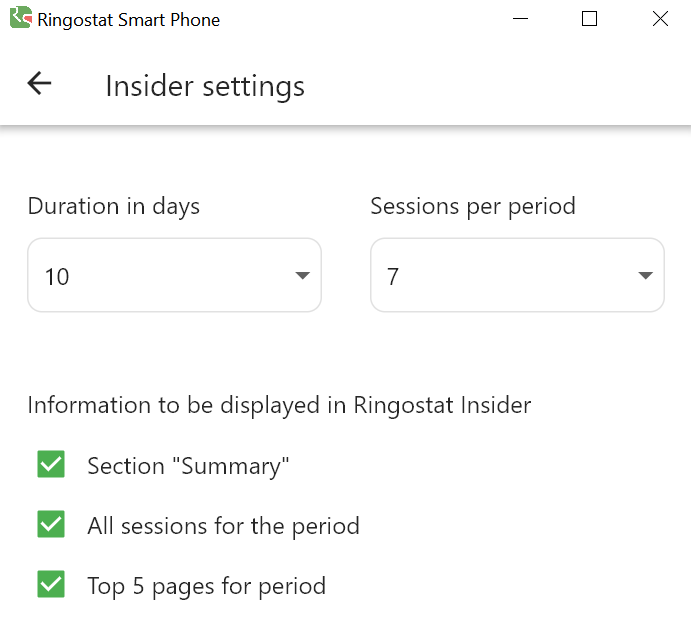
You can adjust here:
- the period in days for which information about the user’s sessions and calls is displayed;
- the number of sessions that can be viewed for a given period.
You can also choose whether to display:
- the User Summary section, i.e. summarized information;
- all sessions for the specified period;
- the top 5 pages most frequently visited by a particular user during the selected period.
Setting up call history
You can change the call history settings:
- the number of days for which data will be displayed;
- the maximum number of calls that will be displayed for the selected period.
VoIP Settings
In the telephony settings, you can:
- reject incoming calls when the manager is already talking to someone;
- add a custom STUN server — what it is and why it is needed, you can ask our technical support.
Technical support
Speaking of technical support. From the settings, you can go to your personal account and write to our technical specialists via chat.
About
In the About section, you can read a brief help and familiarize yourself with the terms of use.
Additional features
Access to application data from different devices
- Any of your devices can display the history of calls and correspondence with users of different messengers.
- All your settings will be available on different devices. Just install Ringostat Smart Phone there and log in to your account.
- After any settings, you will see a green notification that the changes have been successfully saved to the cloud.
Automatically checking your app version and updating it
Every day, the app automatically checks to see if your version of the app is up-to-date. The app will notify you if a more current version is available. Colors will help you understand how critically out of-date your current version is.
Don’t use Ringostat Smart Phone yet? Don’t miss the opportunity to strengthen your sales team with this multifunctional tool. According to our estimates, it can save up to 5 working hours per month for each manager. Download the app on the website and increase your team’s productivity right now.

